
Test 1: Additional Tests for Fine Tuning F and E
Test 2: Eb and D
Test 3: The Curse of C#
Test 4: Tuning Problems on Bb, A, Ab, G, and F#
Test 5: Low F to Low D
Test 6: Low Db to Bb
Test 7: Closure of Whisper Key at Bocal
Test 1: Additional Tests for Fine Tuning
Thumbnail Test
Use the Thumbnail Test to check and compare blade strength. Normally it’s best to play with the strongest blade up. On a wetted reed, press the thumbnail firmly into the center of the blade, about 1/4 of the way back from the tip. Rotate the reed and do the same on the other blade. The weaker blade will cave in more easily than the stronger blade. The thumbnail test can also be used to evaluate the relative strength/balance of the channels in the front portion of the blade. The thumbnail can also be used if carefully done to check the Corner Bend Test (see Quick Guide for Bassoon Reed Tuning, Fig. 2B). The test can also be done on a dry reed with great care and less force in the case of picking out a new reed which cannot be blown for testing.
Another way to test blade strength is the Tap Test.

Blade Strength Balance Problems
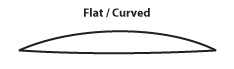
Some reeds are formed (accidentally!) with one blade arched and the other flat, like the Flat/Curved example above. In this case the arched blade will always be significantly stronger, and should be played as the upper blade. If you see a tip opening like this, the curved blade should be weakened over its entire length as an attempt to balance the blade strengths. It is best to avoid reeds with tip openings like this which is the result of the curved blade slipping inside the edges of the flat blade in forming the reed. This is just one example of bad tip openings that will effect the tuning of F, E, and Eb and reed vibration in general.
For more information on solving reed symmetry problems, see Adjustment Techniques.
F-G Trill and E-F# Tests
We apologize! These important tests SHOULD have been published in Quick Guide for Bassoon Reed Tuning.
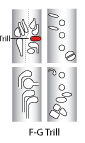
These tests and the adjustment (below) are the “magic bullet” for open F. It helps fine tune open F, giving it a more spacious feel with added pitch flexibility. Just as important, it helps with smooth connections across the break to F# and G (without a break in the tone). See Test Methods Updated for additional tests and fine tuning for slurring into the middle register. Note: this adjustment also helps when slurring across the break to A-flat.
- Play F, then depress and hold the A/B-flat register key checking for the pitch of G. (See fingering below.)
- If flat or unstable in pitch on G, using the tip of the knife carve two small “windows” in the reed diagram below (directly in front of or slightly into the collar).
- Repeat this process for the E-F# trill. It has the same fine tuning point as the F-G trill. (See below.) If it is out of tune remove more cane in the same area.
- Both should play the upper note in tune with stability.
 |
 |
 |
Mute (Alternate) E Tuning Check
This can be a useful fingering as an alternate E when going back and forth across the break to F# or other half-hole fingerings (see E fingering below). Example: the opening of The Marriage of Figaro. It is often flat if there is a dip behind the tip or if the tip is too thin overall. Flatness with this fingering can also be an indication of weakness in the blade arch or resistance point behind the tip section. However, it can be useful as a mute fingering despite some flatness. For a second bassoonist, some degree of flatness can be an indication of better response and tuning of the lowest notes.

Stabilizing E
The addition of the G key is useful when playing E with sforzando attacks at the loudest dynamics. If it is important in reed tuning to have a secure, in tune “bare” fork E-flat (no added keys), then you may need to add the G key to prevent instability on E at louder dynamics. Try to find a balance of tuning for both notes.

Music store reeds are quite often unstable on E. Without any adjustments, the only option is to always add the G key which is a bad habit but may be necessary until the player learns adjustment techniques to strengthen the reed. Often all that is needed is to ream the reed to fit further onto the bocal. Students in some cases do not know that the E fingering is actually producing E-flat!
Avoid the Dip Behind the Tip
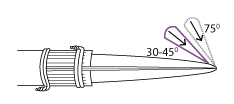
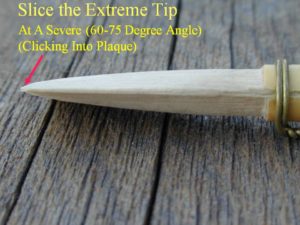
 To avoid the dip behind the tip (Fig. 1F in Quick Guide to Bassoon Reed Tuning), which can lead to unstable pitch and to croaking in the middle register, the tip section of the blade should be sliced to thin and taper the cane toward the tip and corners. This is accomplished by the slicing the cane away rather than “abrasive” scraping, which can cause the dip. Preliminary scrapes for F and E should be sliced at a low angle into the plaque. Finishing scrapes should be at a higher angle clicking into the plaque. These 2 angles are indicated in Fig. 1C of the Quick Guide to Bassoon Reed Tuning. Also see Knife and Sanding Techniques, Fig. S1 for the tip.
The Spongy Cane Phenomenon
The further down from the bark of the can you go, the larger the cell diameters and the greater the degree of spongy, moisture-filled inter-cellular space. This is similar to a sponge that can easily be compressed when it is wet. Also there are fewer vascular bundles (grain) than nearer to the surface of the cane which add more support along with smaller cells with less inter-cellular space. Downward pressure with scraping or slicing at the tip will compress the cane with little result in cane removal as the knife pressure is released. This deflection of the knife is also known as the “spring back” effect in woodworking.
The best method is to keep constant pressure on the knife using both thumbs to drive the knife through the cane. Remove as little cane as possible, nibbling or whittling the cane starting as close as possible to the tip, clicking into the plaque with each knife stroke. It is important to note that the type of reed knife used and the method of sharpening it are critical to your success. A newly purchased knife that has not been resharpened (with a revised scraping burr) will take chunks out of the tip rather than nibbling the cane away from the tip. See knife selection and Knife Techniques.
 Standard abrasive scraping cannot remove cane efficiently scraping across the tip into the plaque. THIS IS THE MOST COMMON FLAW IN KNIFE WORK AT THE TIP OF THE REED! The tip of the cane will compress and spring back up as you cross the tip with the knife.
Chisel Tip Slice
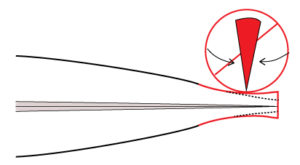
The leading edge of the reed should be as thin as possible across the extreme edge of the tip. This should not be confused with the tip’s lateral taper and tip gradient just behind the tip as indicated in Test 1, Fig. 1D and 1E. Achieving the thin leading edge is again a process of nibbling across the tip but at the steepest possible angle with the knife as close as possible to the edge of the cane to avoid the sponge phenomenon. The outcome should be a very steep drop-off from the cane behind it.
The Use of Files or Sanding Tools for Establishing the Tip
Test 2: E-Flat and D
Slicing the Bow Tie or Scraping the Wings
Some bassoonists feel strongly about creating a “fingernail” profile with significant thinning of the blade from f to d in Fig. 2A, weakening the rails too much to support the middle register. This would be similar to an extremely thin blade in the area highlighted in Fig. 1 in the Quick Guide. It is best to leave strength in the rail through thickness from point d to f. This can also be interpreted as a “W” scrape at the tip which is defined by the “bow tie” a–c–f in Fig. 2A.
It is better to gradually increase the size of the bow tie starting near the tip at ‘a‘ in Fig. 2A, increasing and lengthening a-c toward f.
Fingerings for E-Flat
Although most bassoonists consider adding the 2nd finger R.H. and the Bb key as part of the standard fingering for Eb, some bassoon designs and especially older bassoons are unstable with this fingering. By changing from the 2nd to the 1st finger this problem is eliminated. This fingering also tends to lower the pitch for Eb and can be a good mute fingering especially if the pancake key is added.
Some bassoonists find it necessary to also add the low Eb key to the above fingering to stabilize Fork Eb. With proper tuning the added low Eb is unnecessary. You should strive to have a stable and in tune bare Fork Eb.
Corner Bend Test
Flexibility of the corners in Fig. 2B and 2C are a magic bullet for reed stability and tuning. See also Adjustment Techniques for rail balance at the tip.
Pitch Centering on D
Achieving the correct tuning for D and its relationship to Fork E-flat is often a difficult tuning problem. If bare fork E-flat is strong, stable and in tune, it can cause D2 and its octave above (D3) to be flat. D3 is already a well-known acoustical/bocal/reed problem in the middle register, and this problem is made worse if the E-flat/D relationship is not resolved. When D2 is in tune, further fine tuning adjustments with D3 can make the middle register very comfortable and flexible in pitch. In early Level 1 tuning, the D2 to D3 octave spread may be left slightly flat which can be corrected in Level 3 tuning. But if D3 is extremely flat with the ear plug test, this can lead to serious tuning problems for the middle register. For this reason we call D the “Nexus” note. The most important check for D is the ear plug test as shown in Test 2.2 in the Quick Guide to Bassoon Reed Tuning.
E Tone Hole
The E tone hole has multiple functions. It is of great importance that this tone hole is clean and set to the right diameter and taper in the tuning and voicing of the bassoon. This is critical because this tone hole is not only the primary tone hole for E but also for E-flat. In the register above, it is also a primary tone hole for E and F. Jumping up another register, it is the primary tone hole for short C and C#.
D Tone Hole
Because of the D tone hole’s reduced size compared to the E tone hole, it is just as important to keep it clean to help the octave D3 pitch. In some cases the tone hole insert has a ring of epoxy at the bottom left over from manufacturing that should be removed. In other cases there is a ledge at the bottom of the tone hole from incomplete reaming or one manufacturer’s concept that a ledge a the bottom of a tone hole is desirable for unknown reasons. (If a ledge is found in the E tone, it can be disastrous to the functioning of the bassoon.)
On some bassoons it is difficult to find pitch stability on D3. This is the curse of the wild D and can be related to an improper angle of the tone hole in manufacture or improper length and/or taper of the tone hole. Other factors for the wild D can be sneaky leaks related to C# tone hole or mystery leaks behind the hard rubber liner in manufacture. Bocals also are a contributing factor to problems associated with D3.
Correction From Earlier Publications
Many bassoonists perform a scrape which covers roughly the triangle in the corner of the blade, sometimes referred to as the wings (see Fig. 2A, a-d-f in the Quick Guide to Bassoon Reed Tuning). This approach to scraping the blade is often found to cause problems because it covers too much territory and can accidentally produce dips in the rails (see Fig 2A, point d). Weakening of the rail at this point can cause the middle register C3 and D3 to play flat and/or the entire middle register to be limited in loud dynamics (sometimes referred to as “stacking up”).
The 1991 publication of Advanced Reed Design & Testing Procedure for Bassoon, pg. 14, Objective 2 contained the following diagram for the adjustment of pianissimo E-flat. It states “scrape from d–e to a followed by light scrape from d to a–e without scraping over the edge of the reed (d–a).” We believe that this is NOT the best way to approach the tuning of Eb. It is also the same scrape that is specified in Test 2 Harmonic C, pg. 7. Expanding the wings is better approached moving gradually toward point d, but avoiding scraping directly at point d. (Note: the letter designations have changed since earlier publications.)

The new method found in the Quick Guide refines and isolates the tuning of fork Eb and D. In addition, it avoids the accidental over-scraping of point d.
Test 3: The Curse of C# — The Bastard Note
Flatness on C# is often the result of a dirty or swollen wooden tone hole. Be sure to clean the C# tone hole which requires removing the key which for some may be a new experience. Swabbing can trap fuzz from the swab and/or moisture in the tone hole. As a result, an unlined wooden C# tone hole will also shrink in size over time, making the diameter of the tone hole smaller. Unfortunately this shrinkage is never attended to, making the pitch of C# flatter and more unstable over time. This tone hole can also be the source of dry rot and a sneaky leak that passes through the tone hole and into the cut portion of the wing tenon. For most older bassoons, the shrunken tone hole should be enlarged to 3/16″ of an inch and sealed against moisture with shellac. A significant leak can take place here which robs the bassoon of resonance. Most newer bassoons now have a lined tone hole.
Unfortunately, bassoons are still manufactured with a C# tone hole that is too small and too short in length.* This flaw prevents good pitch and resonance on C# in both octaves using the same (short) fingering. An improvement to the bassoon is to convert the C# tone hole: create a longer tone hole using a metal tube that projects into the bore and is a larger diameter. This addition also proves helpful when the C# is the “speaker” vent tone hole for the alternate “long” fingerings for High Eb4 through F4, which can be flat or unresponsive. (See also slur up tests to the short fingerings in Test 18 of the Quick Guide.)
To ensure stability in loud dynamics and strong attacks, add the pancake key (low E). Play it safe! For some bassoons and bad reeds, this is the only way to ensure a relatively in tune C#. The C# tone hole has numerous important functions: it effects at least ten notes on the bassoon. Besides C#, it serves as secondary tone holes (D-Eb trill), functions as a flick key for E3, and acts as a high register resonance or speaker vent for the upper register.
What causes these problems is that C# is a bastard note! Its location is illegitimate! Besides the diameter and length, the angle of the tone hole is also often incorrect causing pitch instability that cannot be corrected with reed adjustments. Acoustically, C# should be located half way between the D and C tone holes. But due to the wing joint attachment to the boot, the tone hole would need to be in the middle of the metal band around the top of the boot joint. As a result of its location, C# always needs “help” with the awkward addition of the low D key and/or low E key.** (Photo coming soon!)
So if the bastard tone hole’s problems described above is not enough of a bitch, what happens if this tone hole is too large? Going too far can have undesirable consequences for other notes that utilize this tone hole as part of the fingering. For instance, High A and Bb become quite sharp or unstable in pitch due to an oversized C# (High A and Bb can be played without the C# key but lack in power and resonance). Some bassoons require the addition of a bridge key from the High A/Bb register key to close the whisper key for stability and resonance on these notes.
*At the 2016 IDRS conference, I played a brand new professional model bassoon by a highly respected manufacturer that had an impossible-to-play C#.
**Play the opening to the Marriage of Figaro with the Low E/pancake key held down for the back and forth from D to C# instead of back and forth (on and off) of low D key. It is also recommended to put on the whisper key lock to avoid additional thumb gyrations.
Test 4
Tuning Problems on B-Flat, A, A-Flat, G, and F#
The “magic bullet” for these notes is the Ab/Bb trill test and scrape which helps in pitch centering and flexibility. However, these notes can also be individually tuned by thinking of the scraping zone as spokes of a wagon wheel moving closer to the center line (see “If Sharp” under Test 3 for B, and Fig. 4A). These individual scrapes do not appear in Quick Guide for Bassoon Reed Tuning.
Pad heights are critical to balance the tuning between these notes as pointed out in Test 4.2. The reed tuning techniques mentioned in Tests 3 and 4 can only do so much if the pad heights are incorrect and if the tone holes are dirty or swollen. Leaks in this area also significantly contribute to pitch problems. Sneaky leaks at the Bb tone hole are common and often not detected especially when air from the larger tone hole on the smaller, tenor side of the bore leaks across to the two smaller tone holes on the bigger bass bore. (There are 3 tone holes under the Bb pad.)
The Curse of Low G (and F#)
On most bassoons, the low F# and G tone holes are purposely small (flat) to help lower the pitch of the half-hole notes an octave above (which tend to be sharp). However, the half-hole notes can be tuned at the reed (see Level 2 Harmonic Tuning) making this acoustically antiquated design unnecessary. As a result of the undersized low G, it renders them less flexible in the low register (a flaw in bassoon design). Low G and F# are not only flat in pitch, they are also compromised in tone quality often sounding dull and not matching in resonance of A and F. Fine tuning for Low G is also related to the proper depth of the bocal penetration into the reed. See Fundamental Tunings Q & A for more information.
Test 5: Low F to Low D
If you create notches to cradle the first wire in Test 5.1, this will usually lower the pitch of the crow or the general playing pitch of the reed as well as open the tip. To avoid pitch shift of already completed work, it is advisable to cut the cradles into the tube during the break-in process rather than wait until Test 5 or the stability for E and C# may be compromised.
Some bassoonists prefer to create the cradles with the knife as a single angled cut into the impression of the wire position in the tube if one exists. This is a faster method than using a file and is the author’s preferred method. The purpose of the cradle is to avoid “strangulation” of the tube by the first wire. If the cradle causes flatness and instability, tighten and round the second wire so that it is immovable followed by tightening and rounding the first wire but not so tight that it can’t be slipped back out of the cradle.
Bassoonists complain about the sharpness of low D and often pull out the long joint to help lower the pitch of D. Don’t do this! Learn the scrape for Low D found in Fig. 5C and the effects of wire cradling found in Fig. 5A.
If you pull out the long joint, you are adversely effecting pitch in the middle register by causing unwanted flatness in the upper-middle register.
If reed tuning is not sufficient pulling the bell out slightly is a better approach that helps low D. Note: many bocals play Low D with a sharp pitch. Seek out bocals that have a better balanced octave spread for all the Ds. See Crook Conundrum for more information.
Test 6: Low D-Flat to B-Flat
CAUTION: If lowered tuning or increased response for Db to Bb is not needed, you may omit Test 6. Removal of the collar and thinning of the cane at the back of the blade can cause E and C# to become unstable and lower the general pitch of the reed.
If your reed has a collar, tuning of the notes in Test 6 can be lowered in pitch by removing a portion or all of the collar. It is best to start by removing half and remove more as needed to help maintain strength of the blade for the upper register.
Method:
- With a sharp knife, score a line between t and u in Fig. 6A.
- Using a needle file (a very small triangular type is recommended), file into the scored line left by the knife across the reed between t and u.
- Using the knife, slice underneath the collar up to the groove left by scoring in step 2. Once you have gotten under the bark, rotate the blade of the knife upward toward the wire to break off the cane between the old collar edge and new collar. If the groove is not deep enough, the knife may slice underneath the collar beyond the point where you want it to stop. Be sure the groove is deep enough.
- Clean up the area where the collar was narrowed by scraping, sanding, or filing.
Test 7: Closure of Whisper Key at Bocal
Sluggish response or pitch problems in Tests 5, 6, and 7 can be traced to problems with the whisper key pad closure at the bocal or the Low E “pancake” key closure. If the bridge key from the pancake to the wing joint whisper key mechanism is bent or out of adjustment the whisper key may not close at the bocal when the pancake key is fully depressed. For many student bassoonists, the whisper key pad has been damaged through neglect or accidentally leaving the whisper key on when assembling the bassoon. Over time, the whisper key pad can also become indented, and although it looks like it’s closing, it can be leaking.
Test 1: Test the whisper key pad closure by closing the pancake key. While keeping the pancake key closed, touch the whisper key pad at the bocal. Is it completely closed? Does it move? If the pad stays open, a bridge key adjustment may take care of the problem. Rotate the wing joint counter-clockwise until the whisper key pad is closed. Most bassoons have alignment marks on the wing joint and the metal band of the boot joint. Check to see if marks are aligned. This is standard on all newer Renard and Fox bassoons. If the alignment is correct and the whisper key pad is still slightly open, rotate the wing counter-clockwise or add/wrap tape around the bridge key arm until the whisper key closes with the pancake key. The bridge key is often bent by careless assembly of the bassoon or bumping/bending the bridge key when putting the bassoon away.
If the correct alignment closes the whisper key but problems with response or pitch on the lowest notes still exist, it can be that the pancake key is being held slightly open by the closed whisper key pad at the bocal.
Test 2: Press down the whisper key pad at the bocal with the left hand, and slowing close the pancake key with the right thumb. Does the pancake key close completely without resistance or restriction and with no squeezing?
If the pancake key does not close easily with the whisper key closed at the bocal, rotate the wing joint clockwise checking the alignment marks. If this adjustment does not correct the problem, the bridge key may be bent. If there is tape on the bridge key lever, remove tape (or remove the black shrink tubing) and retest. If removing the tape or tubing from the bridge key lever doesn’t correct it, then the bridge key will need to be bent to the correct position.