
Tap Tests
Knife Techniques
Sanding Techniques
Key and Pad Stop Adjustment Points
Wire Adjustments
Tap Test Analysis
This is a very effective, supplemental test for preliminary and ongoing reed tuning. These tests are a simple way to find imbalances within the blade arch and/or the rail strength and taper. With experience you will know and learn the actual pitches that are best tap tones for your reed style.
To quickly determine where a reed is out of balance before scraping, sanding, or final tuning use a tap tone test on the rails and/or the blade. Performing this test on a dry reed is preferred as the pitch is more easily discerned, but it can be performed on a wet reed as well. Corrective sanding and/or scraping may be carefully done on a dry reed.
The reed should produce matching tap tone pitches at the corresponding parts of the blade and/or rail: both right/left and top/bottom.The goal of tap tone tuning is to correct any mismatches in pitch.
Causes of mismatched tap tones include:
- The blades do not match each other in symmetry, strength, or density of the cane.
- The blade warp does not match due to slipped blades or other flaws in forming the reed.
- The reed has not settled into its final warp: it is not yet broken in.
- The tap tone changes after playing a new reed or after the reed has dried out.
- Corrections for individual note tunings unsettles the reed.
- Wire or blade length adjustments.
These mismatches can be corrected. Matching the tap tones in each corresponding location can correct these flaws.
Blade Tap Test Method
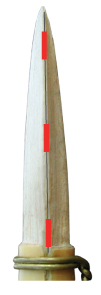
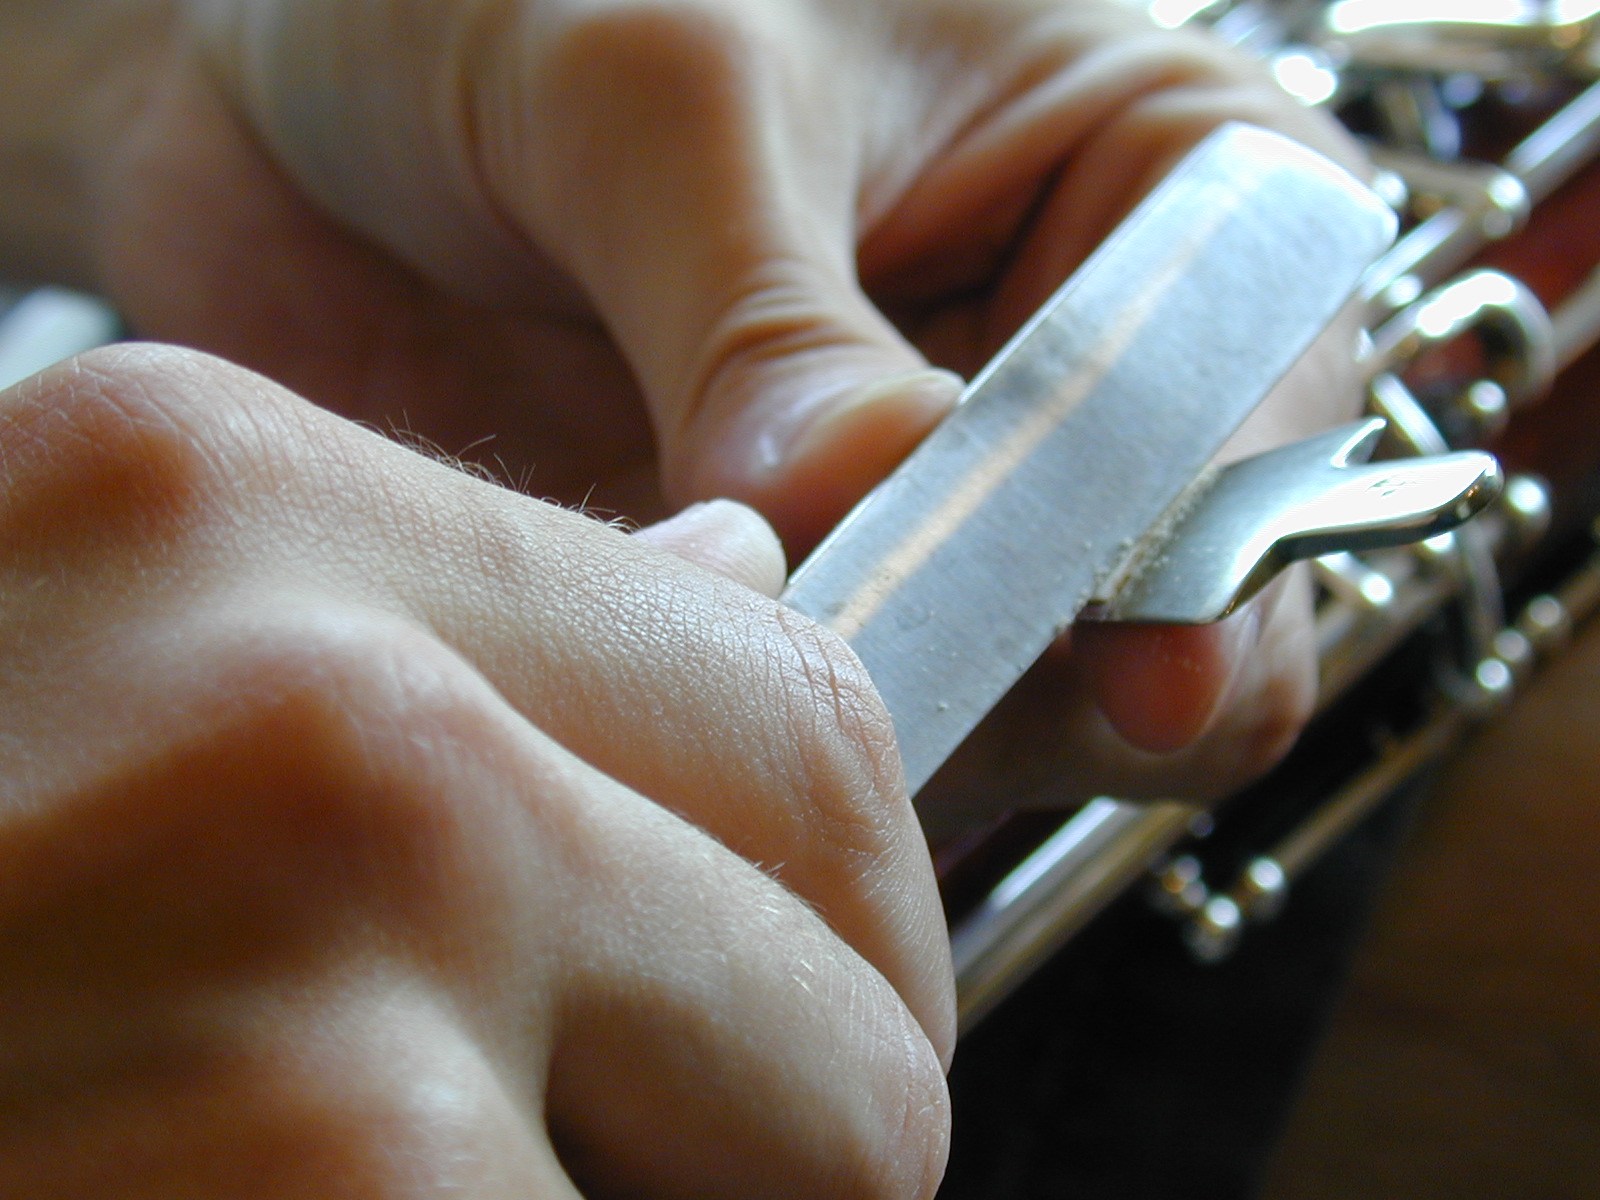
Hold the reed firmly behind the second wire on the binding between the thumb and first finger. Alternate method: place the reed on a holding mandrel. Using the back of a knife blade, pen or pencil, or sanding tool handle, tap on the center line of one blade and then in the same location on the opposite blade. Notice if the tap tone on one side in a location (back/mid/front) is higher in pitch than the opposite blade. Sand the higher pitched blade until the pitch is a close match in each corresponding location.
![]()
For preliminary tests, tap near the step, mid-point, and in the delta behind the tip.
For best results:
- Tap with a narrow implement like the pocket clip on a mechanical pencil, or pen.
- Whistle the tone while you are tapping.
Rail Tap Test Method
Using the same technique, tap locations along the rails on both sides of the reed. Sand in that location on the side with the lower pitched tap.
You can also tap in the channels. Scrape or sand in the area of the channel with the higher pitch. Flip the reed and compare the tap tone on the opposite side, same location.
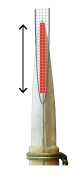
Edge of the Rails Tap Test
Tap on the surface of the blade along the edge of the rails. Start from the back of the blade and work your way forward to the tip. Make note of any changes in pitch. Repeat this for the three other rail edges (right/left on both blades). The pitch should rise as you move from the collar to the tip. The pitch should rise equally in all four locations by about a fifth.
![]()
If tapping along one side of the blade is higher in pitch than the others, sand the higher pitched area in the red zone in the diagram above to lower the pitch of the tap. Be sure to also check the corner bend test, Fig. 2B in Quick Guide to Bassoon Reed Tuning.
A dip can make the pitch go higher sooner and then drop in pitch as you get closer to the tip.
Rail Separation Analysis
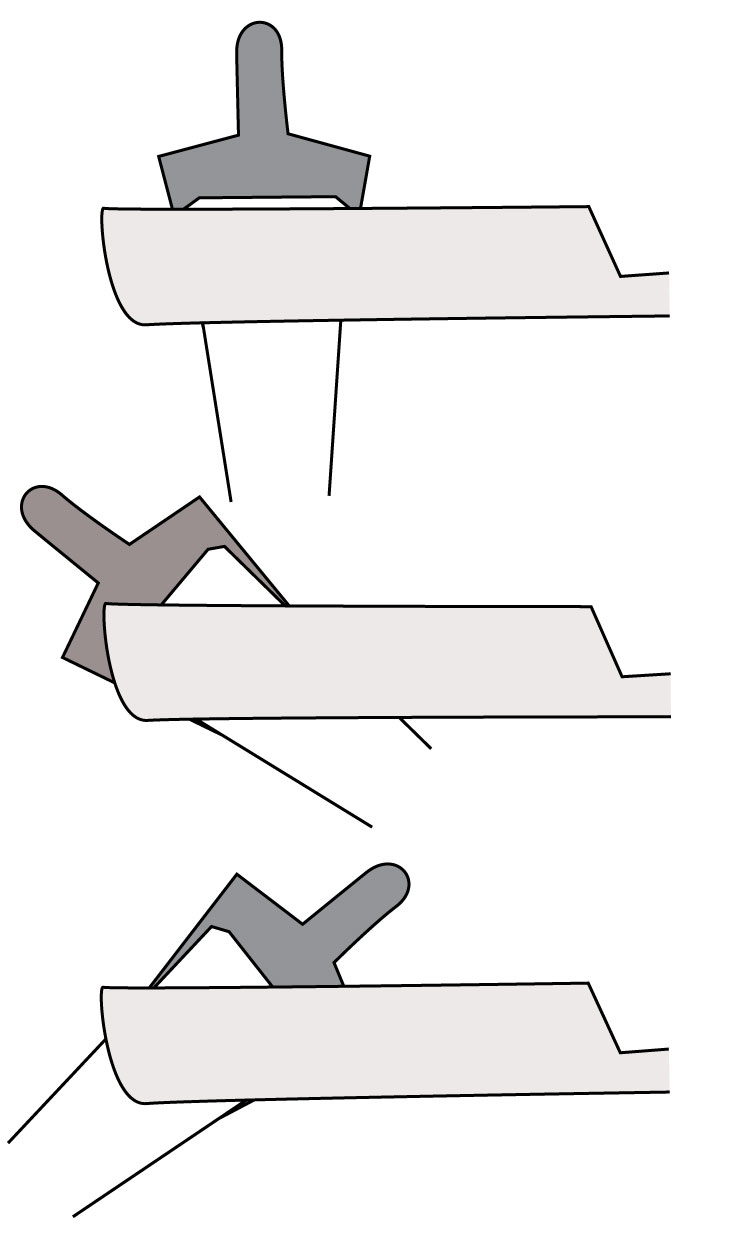
If you notice any discrepancies in the rail tap test above, check for rail symmetry problems. Carefully insert a plaque into the wetted reed far enough to separate the blades for observation. Compare the relative thickness and taper of the rails especially near the tip of the reed. Make note if there is a dip in the rail at any point. It often appears at point d (below). If there is a dip in the railing, be sure to thicken the rail by sanding along the rail (lower diagram) above and below point d.
![]()
 Compare the thickness and taper of the left side rails to the right side rails. If one side is thinner than the other, sand the rails to thicken the thinner rails (lower diagram). Check the rail balance by using the tap test at corresponding points along the rails. Compare the pitch of the tap tone on the right and left rails. If the tap tone is lower on one side, sand the lower pitched rail. This is the best final test of balancing the rails.
Knife Techniques
Knife Scrapes and Slices
Three knife techniques are used:
- Forward scrape
- Backscrape
- Slice
The first two techniques are abrasive scrapes and are NOT recommended for establishing tapers in the wings and at the tip of the reed. The forward scrape is recommended for the channels and for specific low note scrapes (as in Fig. 5C). The backscrape is recommended for general pitch lowering of the notes in Test 5 (Fig. 5B).
The first two techniques are “abrasive” scrapes which are better suited for sculptural scraping and can produce dips or windows in the blade profile. An additional abrasive scrape can be done using the heel of the knife blade (many reed knives are rounded at the heel) for mini channels if the blade does not have a rounded tip. Putting a radius at the tip of the knife is highly recommended. The rounded tip abrasive scrape is used in Tests 2-5 and 8-16. If a standard knife is used without the radius at the tip, the knife may over scrape into adjacent areas which may cause undesirable results.
The slice is the most important knife technique. It is not commonly used or understood by the majority of bassoonists. Unfortunately, if not done correctly, it can take chunks out of the tip of the reed and has led many bassoonists to avoid using a knife. The use of files and sanding at the tip is not as effective in controlling and producing tuning tapers and thin tips.
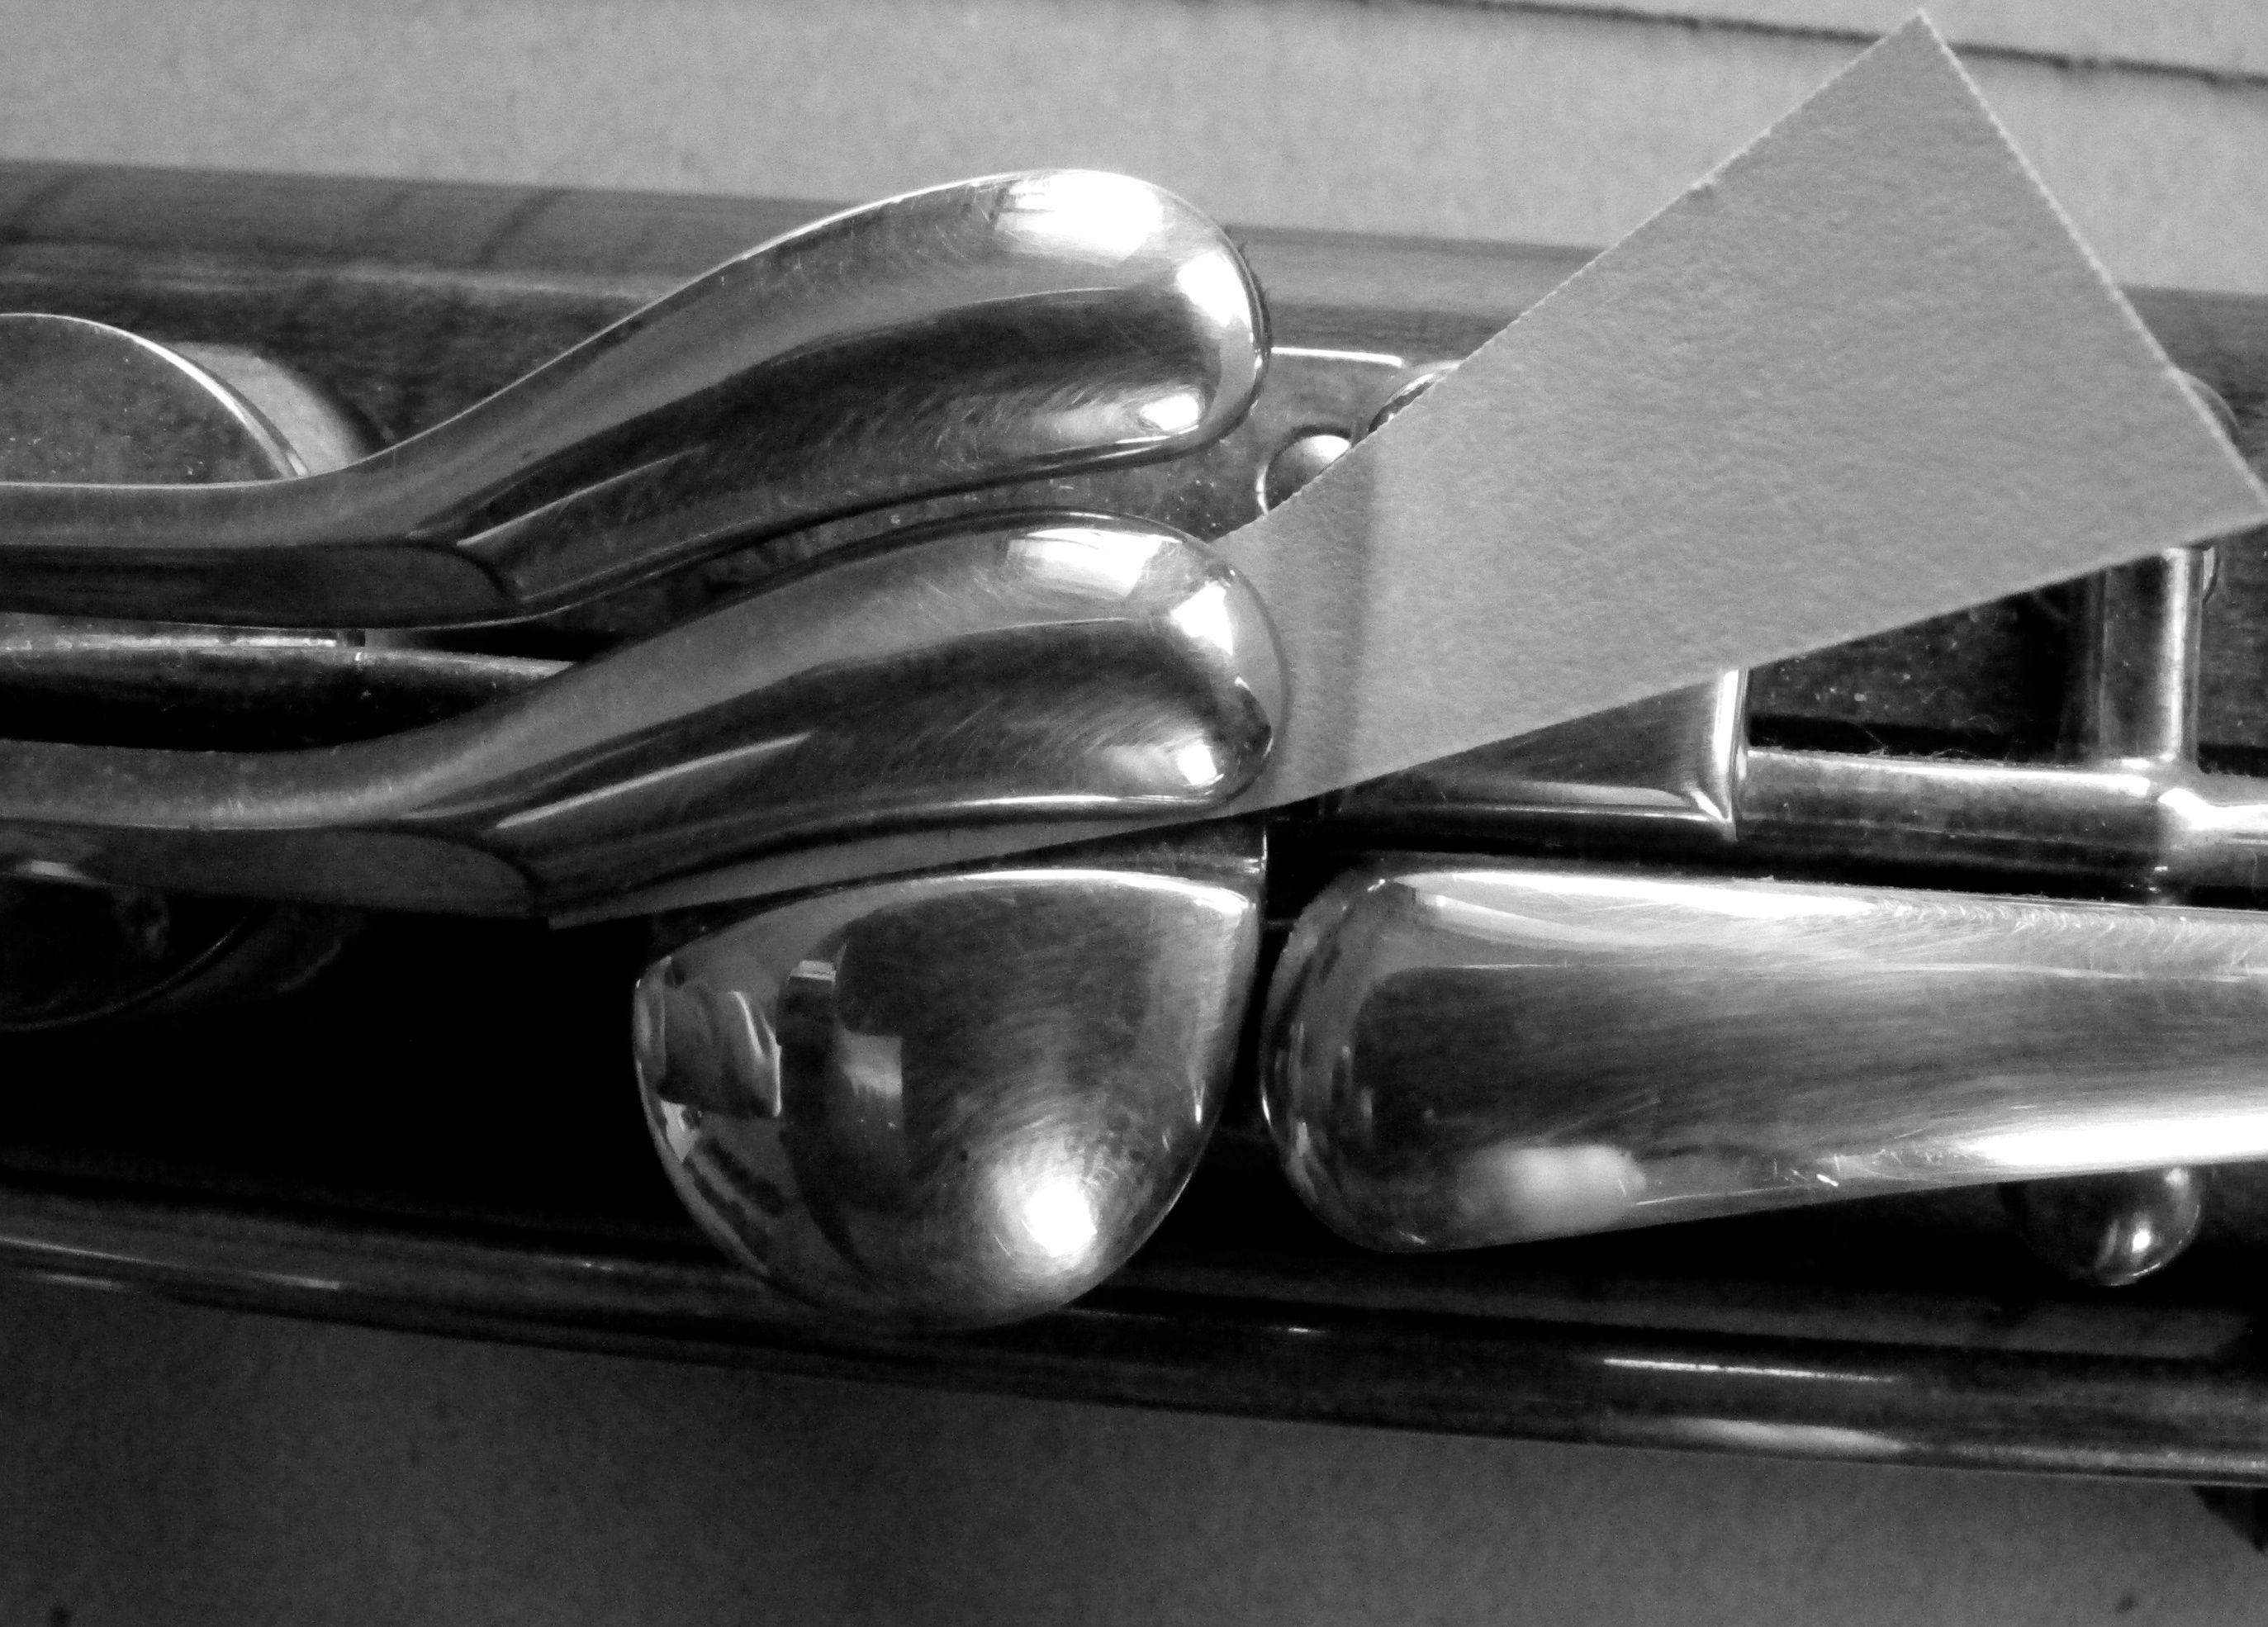
Technique
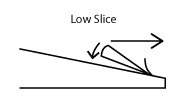
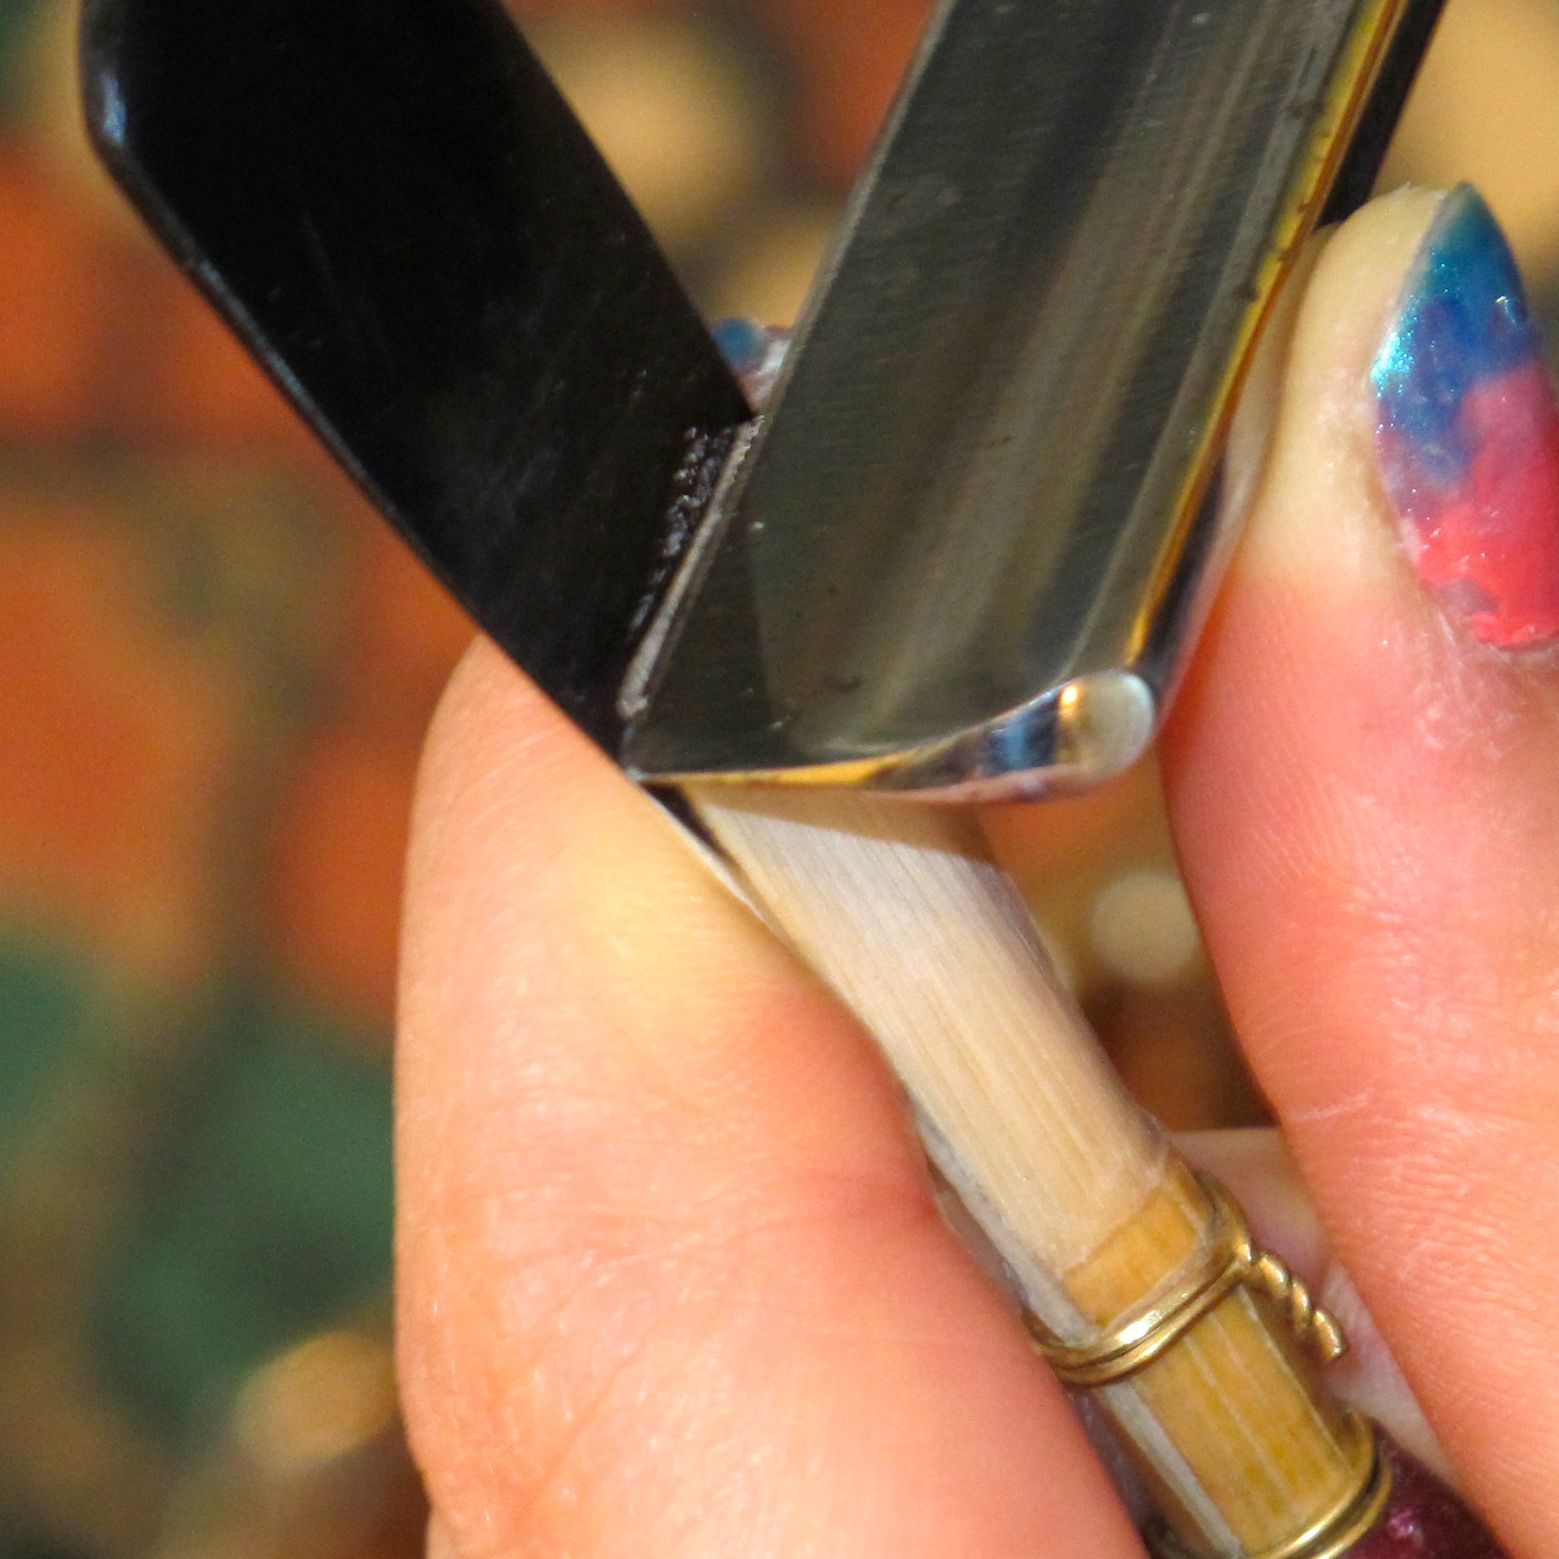
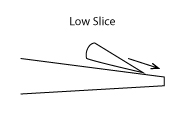 The slice is used at three angles for adjustments at or near the tip of the reed. A low angle slice is used for tapers into the wings (Test 2) and establishing the beginning tip taper. With the knife back approximately 2mm from the tip, press the blade into the cane with the thumbs and once the blade slices into the cane, drop the angle and push through the cane into the plaque to remove the cane without fear of taking out a chunk of the tip (see images on right).
A medium angle slice is used for nibbling across the tip to establish the final tip tapers in Test 1 (Fig. 1B and Fig. 1D). And the high angle “chisel tip” slice is the “magic bullet” for fine tuning at the extreme tip of the reed in Test 1 (Fig. 1C). Figure 1F (Quick Guide) shows the incorrect use of the forward abrasive scrape which leaves the dreaded dip behind the tip. See The Spongy Cane Phenomenon for more information.
Chisel Tip Slice
Those who fail with knife technique at the tip often take chunks out of the extreme tip due to an improperly sharpened knife or type of knife used. (You can’t make a low angle slice with a beveled knife. The knife’s bevel prevents it from dropping to a low enough angle to make the slice without a dip.)
For the knife to effectively slice in a controlled fashion especially when nibbling across the tip (Fig 1B), the knife’s blade should be modified to produce a scraping burr or a hook to pick up the cane as you slice through rather than dig deeper and deeper as pressure is put onto the knife’s blade with the thumb. See Knife Sharpening below.
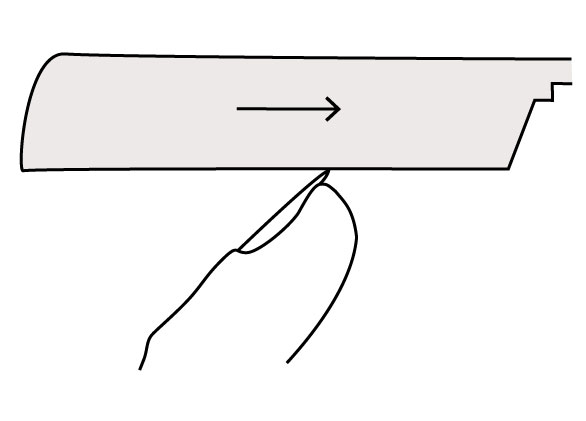
Move the Reed, Not the Knife
Using a holding mandrel to work at the tip of the reed restricts the effective use of the knife in machine-like precision. It is highly desirable to maintain the same angle of the slice when holding the knife by moving the reed itself to different positions. The reed is supported by the first finger of the left hand and is rotated right, center, and left using the fingers while the hand holding the knife maintains the same position and angle as if a machine were making the slice. Both thumbs are involved in the slice: the thumb of the hand holding the reed helps push the knife through the angled slice while the thumb of the hand holding the knife helps guide its position and follow through (see Chisel Tip Slice photo above). In nibbling across the tip, the reed is held stationary and the knife is moved from left to right across the tip. (This assumes a right-handed approach.)
The hand can also assist in nibbling and slicing by using upward pressure of the index finger coordinated with right hand movements. For those that need more to hang on to than the reed, it is possible to use a very short mandrel tip for extra grip. Below are images of what is described for this technique. Please note that these diagrams from Advanced Reed Design and Testing Procedures will be updated to the current technique which is to establish these slices using the first inch or less of the knife blade rather than the middle of the knife blade. This will prevent mistakes of over scraping at point d in Fig. 2A (Test 2) and Test 10.1. It is critical that this area is not accidentally over scraped.
Oops, I Did it Again!
 If the knife starts to dig in too deeply, STOP! Move to a position to the left or right of where you were working and try again. Another technique which can be used is to angle the knife slightly to one side or the other and try taking off the slice. The type of plaque that you use can also cause problems if it is too rounded as is the case with inexpensive plastic plaques. It is better to use a flatter but rounded plaque such as an ebony plaque or contra bassoon plaque.
If you are making a low angle slice into the wings and the blade catches along the way, digging too deeply, STOP! Re-angle the reed so that it is straight (90 degrees to the knife blade) and using an abrasive scrape, go lightly over the area where the blade caught, and make the angled cut again. This is also sometimes called the “clean up” scrape. It can be recommended to do this very lightly after low angle corner scrapes are performed.
Selecting the Proper Knife
Most reed knives are not properly sharpened for reed scraping as they come to you brand new. Many bassoonist shy away from using knives for thinning and tapering the tip because in their experience using knives, they take chunks out of the extreme tip. When new, most knives are sharpened in such a way to cut straight through cane and this results in chunks being removed rather than the cane b eing sliced away, like sharpening a pencil or whittling.
The only type of knife that we recommend for working at the tip is a hollow ground wedge type knife of medium to hard steel.
We do not recommend beveled-type knives for tip work as the angle of the bevel restricts the low angle slices needed to make a thin tip and corner tapers. Some razor type knives come with a very slight bevel at the tip and do not restrict low angle slices, such as Landwell.
Thin bladed hollow ground razor style knives are popular with oboists, but the blade is too thin and can bend when used in defining the bassoon reed tip.
Knife Sharpening
From Secrets to a Better Bassoon Reed
Bassoonists rarely have sharp enough knives. A beveled or beveled/concave knife is preferred for roughing out the scrape. Use a well sharpened hollow ground, wedge-type razor knife for finishing work. A thin bladed hollow ground knife (such as the Philadelphia/Herder or Albion) can be too flexible, bend at the tip of the knife, and “chatter” when scraping. However, the Albion can be a good, inexpensive starter knife until a more expensive wedge-type hollow ground can be purchased.
It is important that the finishing knife be sharpened to produce a slight scraping burr on its edge. This will allow you to whittle small amounts of cane to produce an extremely thin tip without digging in too deeply. Dull or improperly sharpened knives are the principle cause of ruined reed tips (i.e., taking out large chunks of cane). To test the condition of a knife’s sharpness, run the knife edge along the tip of a fingernail, being careful not to touch your skin.
Fingernail Test
If it feels rough or you notice bumps, the knife edge needs to be restored. Depending on the knife’s condition, if not too rough an edge it should be sharpened first on a medium or medium-fine ceramic benchstone (grit #) or equivalent until the blade edge feels smooth. If the blade is extremely dull or rough it may require a courser stone or many strokes on the stone to sharpen the edge. The angle of the knife to the stone should be quite low, almost flat to the stone for razor knives (double hollow ground reed knives) and sharpened on both sides/both directions (flip the knife).
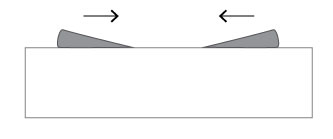
Figure 1
Once the blade edge is smooth (see fingernail test above) put the finishing edge and burr on with an ultra-fine hard Arkansas stone, diamond, or ceramic benchstone. To achieve the burr, the knife blade is raised to a slightly higher angle with 3 strokes from right to left (Fig. 2 and Fig. 3) followed by 1 stroke from left to right at a greater angle (Fig. 4 and Fig. 5). (Reverse if left-handed.)
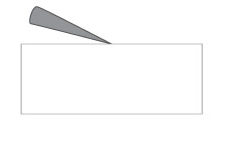 Figure 2 |
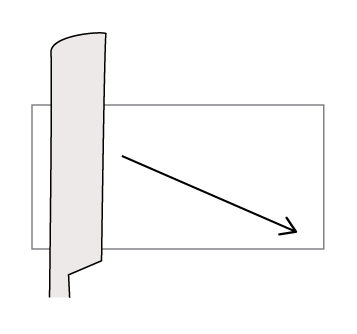 Figure 3 |
|
Figure 4 |
Figure 5 |
Be sure for all knife sharpening that the blade is pressed firmly and squarely against the stone and does not rock as it passes across the stone. Some prefer to push the blade with both hands across the stone rather than sweeping it across with one hand. A light honing oil may be used with an ultra fine, hard Arkansas stone.
Establishing the Scraping Burr
Place the prepared blade firmly against the stone at an angle of approximately 75 degrees. While pressing down with the handle, pull the knife blade quickly and firmly towards you across the stone (see Fig. 6 and 7). Note: new double hollow ground reed knives do not come with an established scraping burr. Using a knife without a scraping burr will cause the knife to dig in too deeply when establishing the tip and may take chunks out of the tip of the reed.
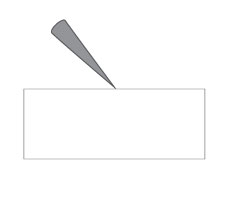 Figure 6 |
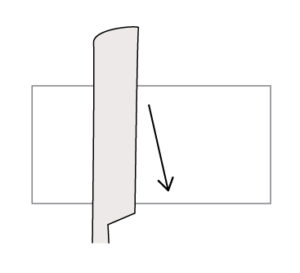 Figure 7 |
If you have achieved the proper angles to produce a burr on the knife, the knife will “catch” if dropped lightly against a downward angled fingernail (Fig. 8). If the knife is too dull or has too much “hook” it will slide off the nail. Recheck the hook frequently.
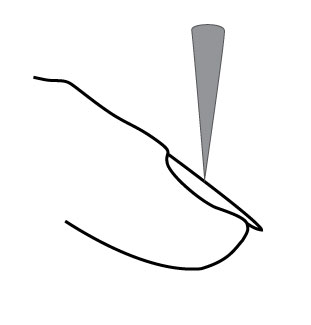
Figure 8
WARNING: Do not ruin the scraping burr by using the knife for other tasks, like reed shaping, tip cutting, and back scraping. If you use your finishing knife for back scraping, use the area of the blade closest to the handle so that you don’t lose the scraping burr.
See also Knife Sharpening videos from Charles Double Reeds: Sharpen Your Beveled Double Reed Knife and Sharpen a Double Hollow Ground Reed Knife. This video demonstrates an alternative way to sharpen the knife and establish a scraping burr. The method outlined above is the quickest way to reset the burr.
Beveled Knives
There are two types of beveled knives: one with flat, parallel surfaces (Fig. 9), and a second type where the long side of the surface is hollow ground. Beveled knives come in right- and left-handed configurations. Beveled knives are laid flat on the stone for sharpening as in Fig. 9.

Figure 9
Wedge Knives
This type of knife is similar to double hollow ground knife but without the hollow ground. These can be thin or thicker and are common in folding reed knives.
Stone Cleaning
Wipe the surface of the stone clean frequently. Dampen the sharpening stone with lighter fluid and wipe clean using a paper towel to remove the build-up of metal residue.
Sanding Techniques
 Click here to learn how to create a Sanding Tool
Using the Sanding Tool Like a Knife
The same techniques and angles called for in the knife techniques above can be employed using a sanding tool like the ones pictured above made from artist’s spatulas. In addition, a sanding tool with a pointed tip is essential in fine tuning the reed at the rails as shown in Fig. C (page 10) of the Quick Guide.
Scraper and Graver Techniques
In some cases you may find it easier to use a scraper tool to produce “mini channel” or “line” scrapes called for in the Quick Guide. These appear in Test 2-5 and they also prove useful in Middle Register channel scrapes if the reed knife does not have a rounded tip. See inexpensive scrapers and gravers in Basic Tools and Supplies. These tools are pushed along the area of cane that you want removed.
The inexpensive tools mentioned above can do the same or better adjustments than a “Reed Geek” for much less money. An oval graver is a very effective tool for high precision lines and mini channels. The Reed Geek is not effective at producing a fine tip on the reed.
Key and Pad Stop Adjustment Points
Tests 4, 5, 6, and Appendix
Test 4
For sharpness on the notes F, G, and A in Test 4.2 and/or for sharpness on B-flat, A-flat, and F# in 4.3, use temporary sticky note paper shims in layers to lower the pad height (see Figs. 4C, 4D, 4E, and 4F in the Quick Guide). Add more shims as needed until the pitch balance is correct in tuning between notes. It is very common for F to be considerably sharper than G (shim under pancake key stop. See Fig. 4C). The B-flat pad height is too high on most bassoons, requiring a shim under the B-flat key (Fig. 4C).
Over time corks and felt under key stops and pad stops will become compressed through playing the instrument or may fall out. This will raise the pitch of the effected note. Note: the F# rocker key connection to the F key (Fig. 4E) may be missing cork or felt. It should automatically and completely close the G tone hole (fourth finger F key).
For flatness on the notes F, G, and A in Test 4.2 and/or flatness on B-flat, A-flat, and F# in 4.3, the pad heights need to be raised. Pad stops or key stops may need to be sanded away or completely removed to obtain a workable pad height for tuning but this may still not be enough depending on the bassoon design. As noted in quick guide, the half hole note’s F#, G, and Ab are tuned slightly flat in the bottom octave on most bassoons to help with sharpness of the half hole notes. We now know due to our published reed tuning techniques that the half hole notes can be tuned at the reed and do not require built in “out of tune-ness” that has been the standard in bassoon making for hundreds of years. Unfortunately, raising pad heights beyond our recommendations in the Quick Guide cannot correct all cases of flatness. In such cases it will require increasing tone hole size to raise the pitch (making tone holes larger). If you are not brave, visit a bassoon repair specialist. “Tuning tape” may be living in your bassoon’s tone holes, adding to flatness. If you’ve never removed keys to uncover the tone holes, it is worth checking. In addition, tone holes may be full of gunk and grime reducing a tone hole’s size. Tuning tape is a poor substitute for correct pad heights.
Tests 5 and 6
The key mechanisms for the lowest notes on the bassoon are often out of adjustment due to leaks that greatly effect tuning and response. If the reed adjustment techniques outlined in the Quick Guide do not solve pitch problems checking for leaks is imperative. Pad heights are also too high even on brand new bassoons contributing to sharpness.
For the long joint, a simple leak test is to remove the joint from the bassoon, place the large opening against the calf of your leg, close the Low B key without touching the C and D keys. (They should also close completely when Low B is closed.) Blow air into the small end of the long joint tenon. It should hold the air against your breath with just the Low B key depressed. It will be obvious if air is escaping as you will hear a hissing sound and you may see the Low E-flat and/or Low D-flat pads lift up. To find the “leakers” press on each pad individually while you are blowing to see if the leak stops. Once you know which pads are leaking you can take the next steps (see below for information on individual pad adjustments).
For tuning purposes, pad heights are usually too high causing sharpness in pitch. To check tuning, most pad heights can be temporarily adjusted to lower them with paper shims: use ordinary paper folded in layers as needed and inserted into their proper tuning locations. Shims can also be helpful in correcting leaks. (The exceptions are the normally-closed tone hole notes (E-flat and D-flat) which will require “sticky” note paper to hold in place under or on the cork or felt key stops.) These will need to be built up in layers to test proper pad height. Once the proper pad heights are determined, make them permanent using sticky note paper layers attached to the key, key stop, or cork. These include the following notes:
- Low D-flat (cork key stop may be missing)
- Low E-flat (cork key stop may be missing)
Low C and D Pad Closure
When the Low C key is touched by itself, the Low D pad should also be completely closed. With the C completely closed, press on the low D pad to see if it moves. If it is not completely closed, it will require the adjustment of the lever in Fig. 7C (Quick Guide). The lever should be bent slightly upward which should close the D pad. If the D pad is now closing properly check to be sure the C pad also closes without resistance, requiring extra pressure from the thumb. Care should be taken that the C key closes properly. If bending the lever does not close the D key and causes resistance on the C key, then a shim is required on the D pad cup lever (see below).
Another technique to close the D pad (if the C pad is completely closed) is to add shims between the lever from the Low D key touch to the Low C pad lever. This technique will also lower the pad and pitch of low E. This may or may not be desirable. Note: the Low D to C lever under the C key has a layer of felt. If the felt is missing or has been compressed over time, it is recommended that the felt be replaced or these adjustments may not work properly.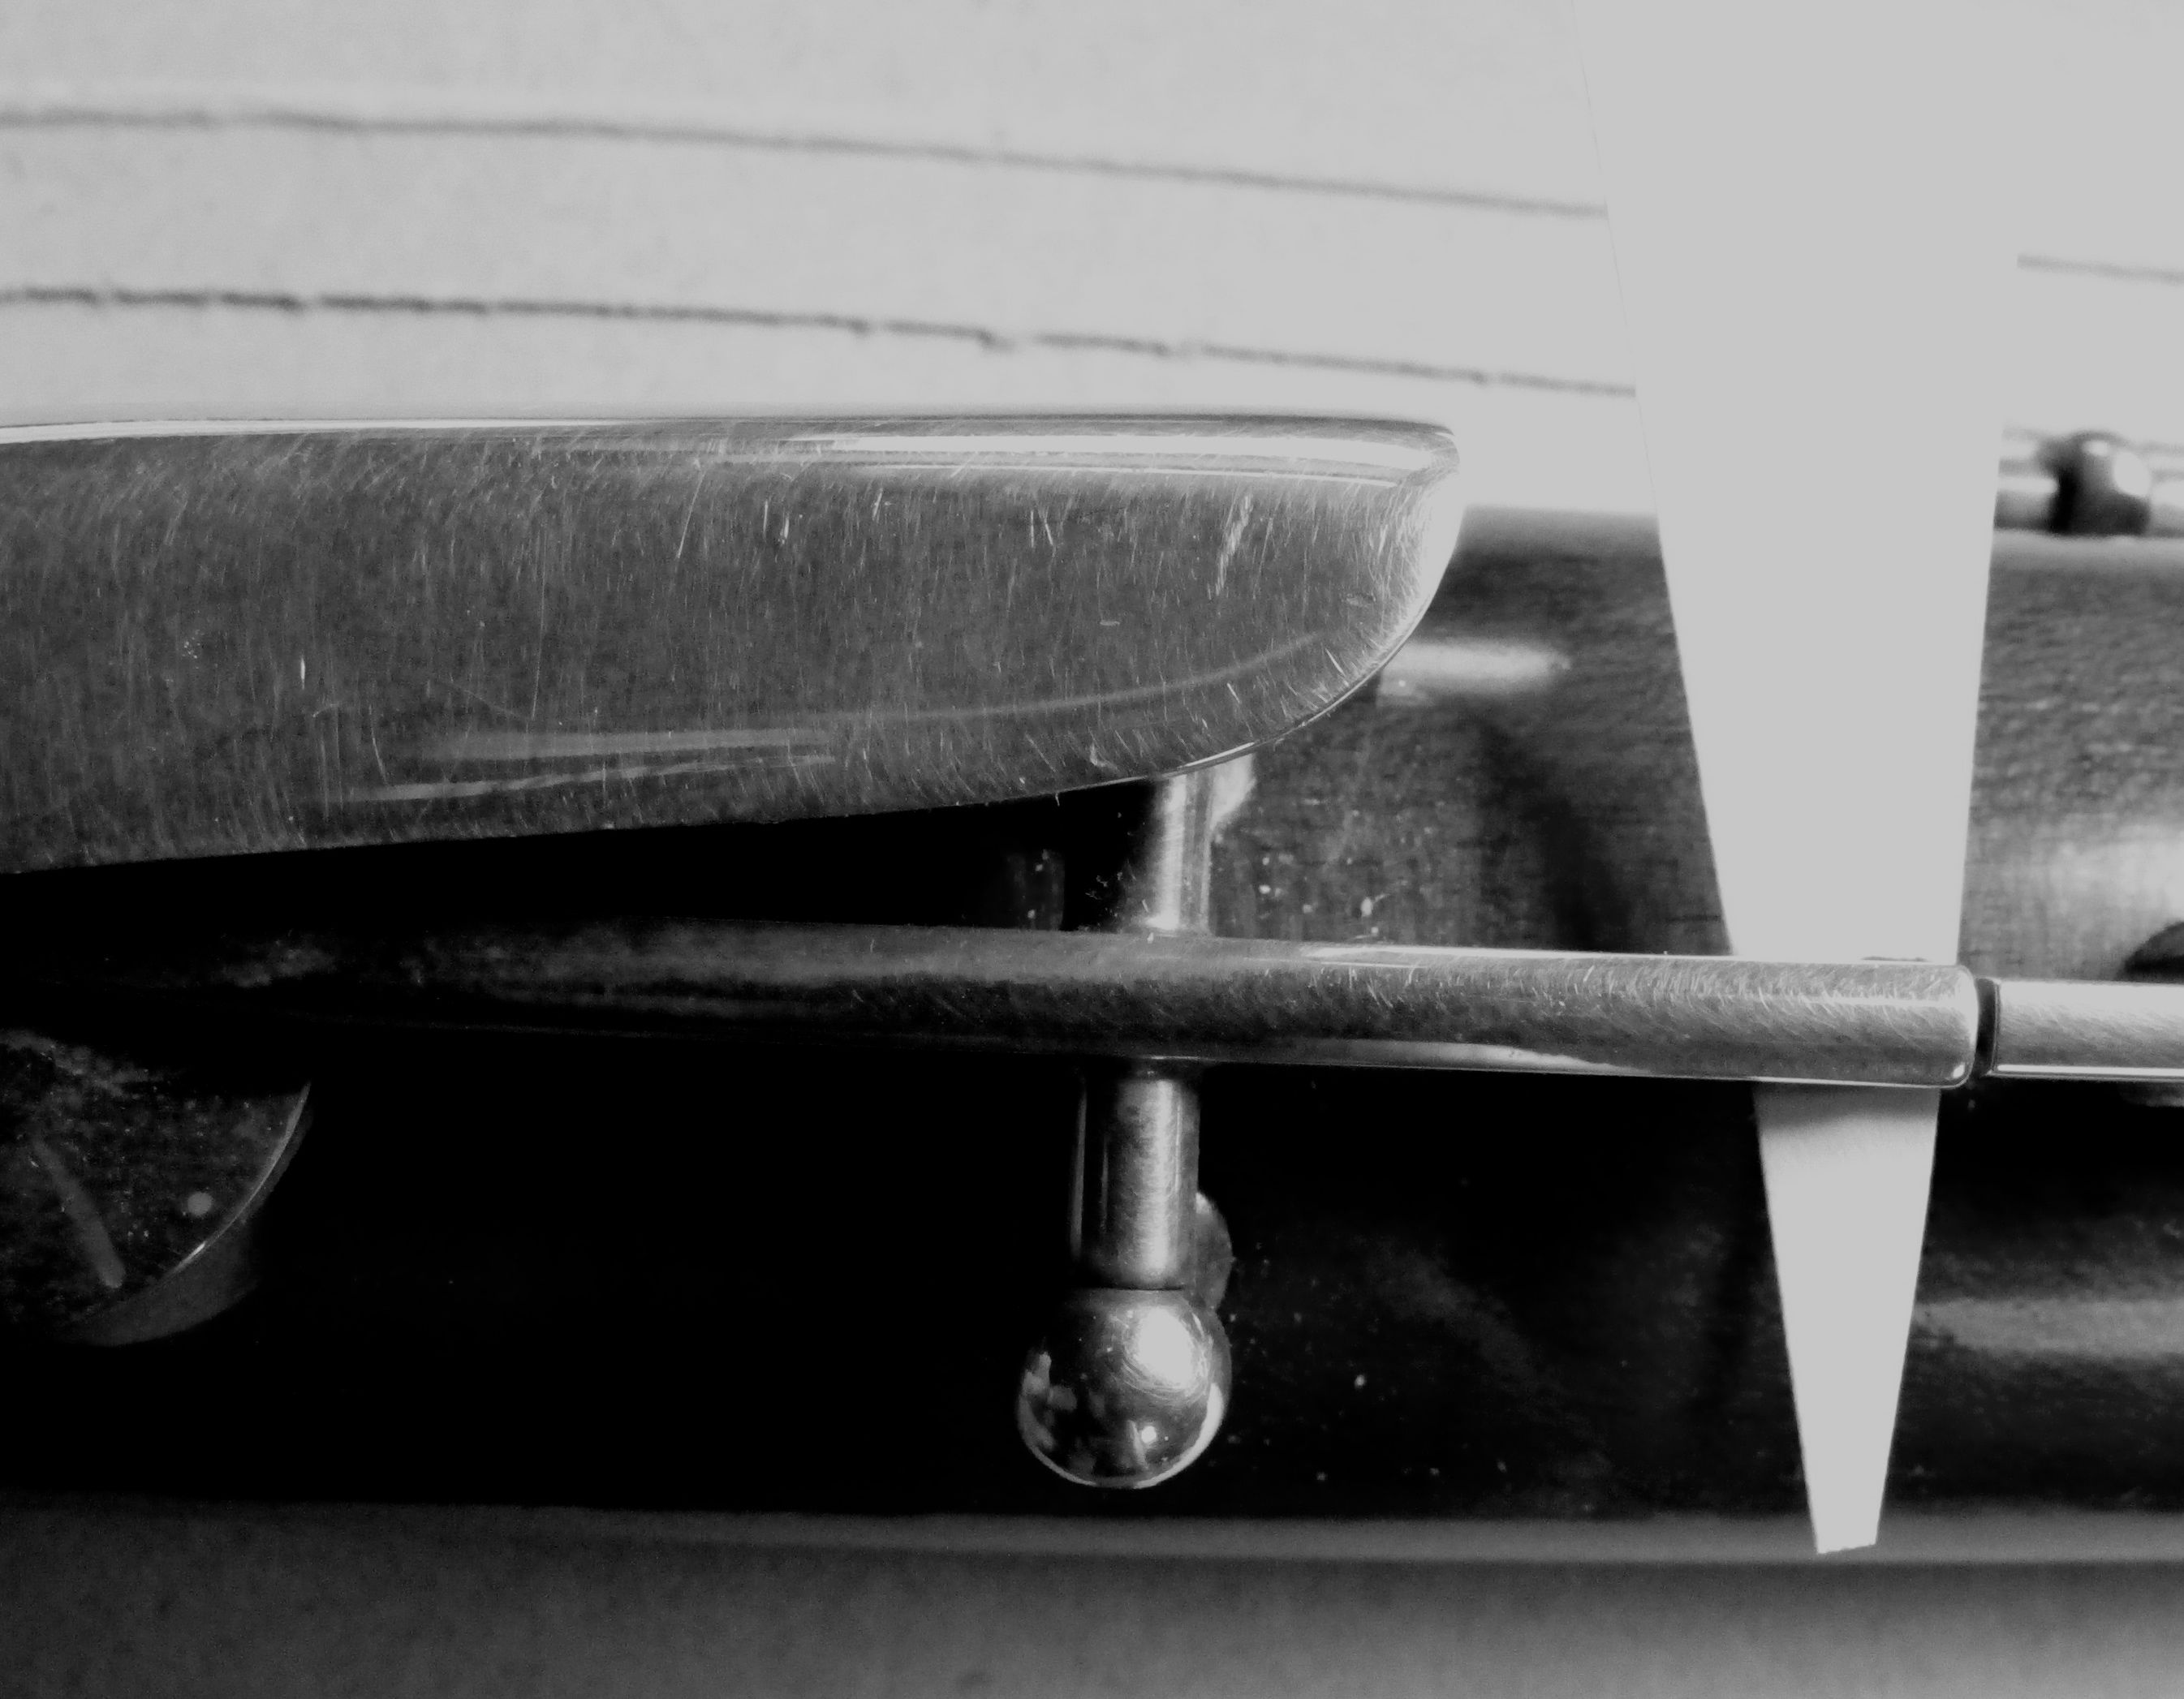
Low B Pad Closure
Touching the Low B key should completely close Low D, C, and B. If touching the Low B key by itself does not close all pads completely, shims will be required below the B touch and/or the Low B pad lever. Before making this adjustment, always double check that the C and D pads close completely when touching the Low C key alone.
Glossary
- Tone hole
- Touch points
- Keys
- Pad Height
How to lower the pad height (pitch) for Low B
Add paper shims on the bridge key that closes the Low B tone hole.
How to lower the pad height (pitch) for Low C
Lower the pad height at the key stop lever.
How to lower the pad height (pitch) for Low Db and E-Flat
Add sticky shims under the key’s cork or felt.
How to lower the pad height (pitch) for Low D
Add paper shims under the Low B key thumb touch point (in between the key and Low C touch/above the pad cup).
How to lower the pad height (pitch) for Low E
Add shims between the Low D key lever and pad stop.