
Want more? Click here for Introduction Q & A
What Can I Expect to Gain from the Quick Guide?
When listening to a bassoonist, you will be able to hear what may be wrong with the player’s reed, bassoon, or tone production. This can be a blessing if you are working with your students or your own reeds where you can learn to quickly correct pitch or response problems. It can also be a curse if you are listening to a bassoonist sitting next to you. It is surprising how many bassoonists continue to play certain notes out of tune, even professional bassoonists on recordings or sound tracks. Within this publication the problems encountered with tuning are identified, with several solutions presented. Examples of problem notes that bassoonists complain about are low D, middle D, half-hole F#, E and fork Eb, Bb, etc. All these notes and others can be played consistently in tune using the adjustment methods and suggestions found within the Quick Guide.
The Golden Reed
Warm Up
Method
The Break-in Process
Tip Profilers
Reed Designs
Reed Shapes
Anatomy
Blade Profiles (and the Cut Reed)
Gouge and Cane
Tip Openings
Climate
Bocals
Curses
Bassoons and Bells
The Golden Reed
Definition: a reed that will play no matter how poorly it is made or adjusted. Perhaps 1 in 100 reeds.
Warm Up
If your bassoon is cold to the touch when you take it out of the case, it is best NOT to warm up until your bassoon comes up in temperature. If you start playing your bassoon while cold the inside of the bassoon will become “clouded in” with your breath, filling the bore with moisture. Just let it sit for a few minutes to come up to room temperature. Then proceed to a warm up procedure starting with the lowest notes to warm up the entire bore of the bassoon. See Teacher’s Supplement to Quick Guide.
Method
Test Objectives
To accurately test a reed you must measure its performance objectively. The reed tests presented measure the following:
- Pitch centering that is “true”
- Pitch stability and flexibility
- Ease of articulation
- Clarity of articulation
- Ease of register change
- Ease of response within registers
- Ease of pianissimo and fortissimo
If you can define the problem, you can fix it!
This method will also allow you to quickly evaluate a new reed or potential reed purchase to ensure that you are not wasting your time with a reed that will fail you. Evaluate it; modify it. A professional player can tell with two simple tests whether a reed has potential: it has a nice tip opening and it crows–dry!
False Pitch
The tuning method uses ear plug tests which show whether a note is true or false in its pitch and/or overtones. The method also includes comparisons of regular fingerings to harmonic fingerings to help define true tuning of the reed.
A simple test of whether the reed is true or false can be accomplished in a reverberant auditorium. Using the “bounce test” you can hear whether a note has the same pitch as you hear it leave the instrument as what bounces back from the hall’s reverberation. Simply play a very short full-bodied single staccato note and listen to what returns. Try this on different notes. This test will give you clues to the notes which are false, sounding out of tune to the audience vs. what you hear in your own ear as you play the note. It is best to perform this test on an empty stage so you can hear yourself clearly.
“You guys sound really great, but…”
We were rehearsing Mozart’s Haffner Symphony. The second bassoonist and I decided to play on some very light, older reeds to make the double-tonguing passages easier. During the break the guest conductor walked up to the bassoon section to say, “You guys sounds really great, but you sound sharp all the time.” We decided to change reeds because the comfortable reeds that we were playing were too old and worn out to produce a true pitch. They had become “false” in their overtones.
“But I am playing perfectly in tune!”
…but everyone else heard him as flat. This principal woodwind player was fired because he played out of tune, yet he could “nail” the pitch on a automatic tuner exactly at 440 on any note. The most likely answer is related to tone production using under-supported breath and a too-open vowel with no variation in breath or vowel shaping. It is common to hear bassoonists keeping a too-open vowel in the tenor range and sounding flat. The musician in the example above was a flautist. It is also common to hear brass players “over blow” their instruments with musicians perception that they are playing sharp. In auditions, a committee sitting in the audience can hear the sound coming from the brass player’s bell sounding lower in pitch than the reverberation in the hall due to “over blowing.”
The Break-In Process
Many bassoonists start scraping a reed and playing it before it is stable and settled. There is something about a new reed that can be intoxicating in its first few days of playing. In some cases, the reed will play very well in tune, surprisingly. However, after a couple of days or a week of playing it can turn suddenly on a dime to your frustration or embarrassment. As a longtime reed maker who also has sold thousands of reeds, customers prefer to have reeds that are not moving targets, that are stable from the beginning. Using a non-playing break-in process prevents mistakes often found in early reed adjustments to get a reed vibrating. Cane will continue to remind you of its shape memory until the forming of the reed has completely settled.
Tip Profilers
If you have over $1,000 to spend and do have a cane hardness meter and you make a lot of reeds, a tip profiler may be a worthwhile investment, especially if you are working from a thick initial profile. If you do NOT have a cane hardness meter ($600-$700), this would be a better investment to help eliminate unsuitable cane before you make it into a reed.
Tip profilers can also cause problems in their use.
Cracked Blades
The hold-down lever that squeezes the blade to flatten it will often crack the cane. Several solutions to avoid cracked blades include 1) wet the cane in very hot tap water rather than cold water. After soaking in hot water, increase the tip opening size by squeezing from the sides at the wire. Don’t use the hold-down lever that flattens the cane against the “plaque” that supports the reed’s blade. Always ensure that the reed is firmly attached to the holding mandrel.
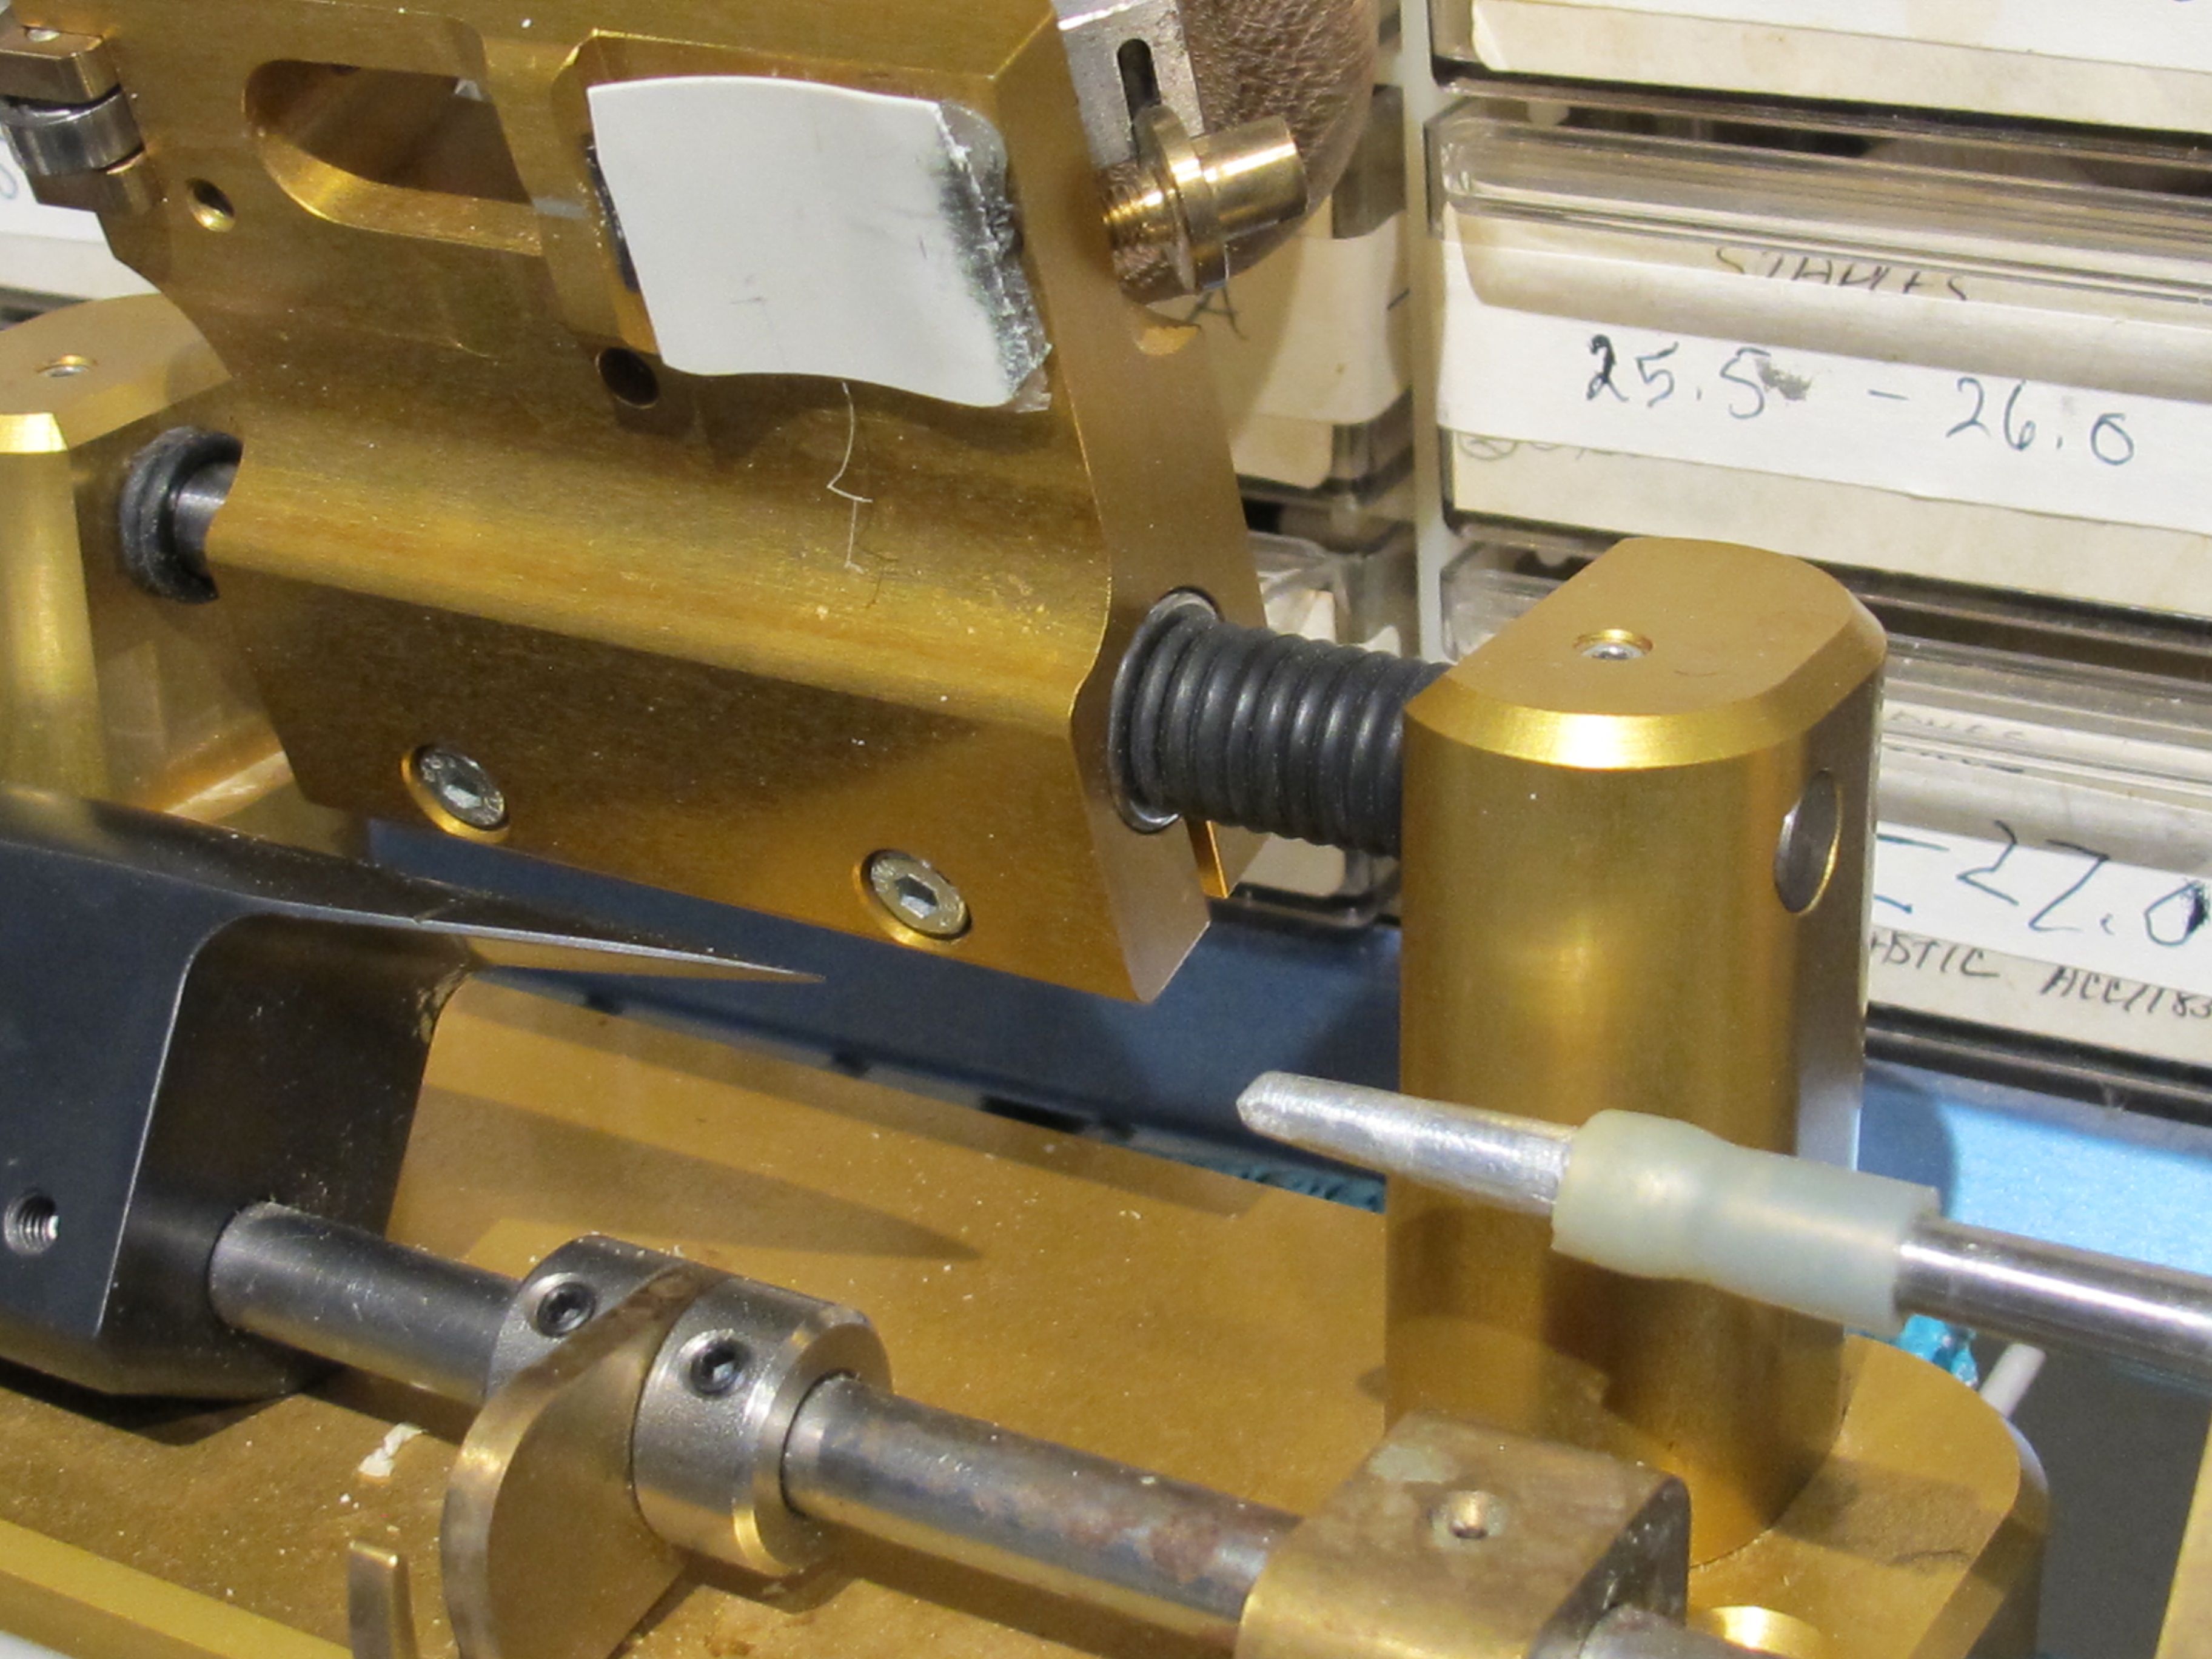
Other effective solutions to eliminate cracked blades include attaching a springy curved piece of plastic or metal from a one-inch mini window blind so that the curved edge of the blind is just behind the tip of the blade. This forces the cane down just behind the blade as shown in photo below as a replacement to the hold-down lever.
Another problem with tip profilers results when the mandrel tip that supports the reed does not line up properly with the profiler’s stationary plaque. This also results in cracked blades. To prevent this problem, insert a short, stubby mandrel tip section into flexible rubber tubing which is mounted to the profiler’s original mandrel as shown below. This eliminates a misalignment of the reed on the plaque and cushions and allows flexible alignment with the plaque.
In our use of tip profilers, the amount of cane removed from the tip of the reed is approximately 5/16″ (8mm). If more cane is removed it can cause a severe ridge (drop-off) across the profile, and can weaken the delta area of the blade requiring an additional clip of the blade if E natural becomes unstable. In some cases the ridge is only on one side of the blade and not the other. This can be an indication of symmetry problems of several potential types in reed forming or profile balance.
The technique used in removing the cane can also cause a problem if the blade is sprung up slightly on either side. It is best to start in the middle with a very light touch, gradually moving right and left and increasing the depth of the cut with additional strokes (right and left).
To repeat, soak the reed in very hot tap water for 5 minutes prior to profiling. This may be the most significant “tip” to avoid cracking the blade.
Reed Designs
Besides the many sizes, lengths, shapes and other variables of reed designs another factor must be considered. Bassoonists fall into two camps: those who blow forcefully with greater air pressure and those who put very little air into the reed. The latter may do this because they don’t need much sound or dynamic range in their ensemble or their hall’s acoustics favors the bassoon and/or they play on a very free blowing bassoon. The former may find that to get a wide dynamic range and the sound into the hall requires bigger reeds, bigger bassoons, and more effort in blowing.
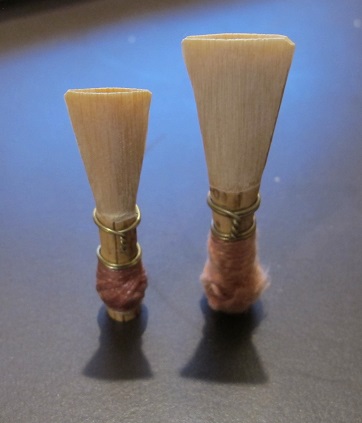
The reed on the left is from Bernard Garfield, former principal of the Philadelphia Orchestra who played in a very bassoon-friendly hall acoustically. His extremely small, short reed helped him keep the dynamic of the bassoon from being too loud in the woodwind section. The reed on the right is from Annie Kosanovic Brown who studied with the principal bassoonist Gunter Piesk of the Berlin Philharmonic and represents a larger German style reed. Incidentally, Annie was the first woman to play as an extra bassoonist in the Berlin Philharmonic.
Reed Shapes
Components of the reed shape include:
- Tip width
- Upper blade flare
- Lower belly flare (concave, convex, or goblet)
- Waist: the narrowest point of the reed shape, which can be in front of the first wire (Garfield shape) or more typically is anywhere between the first and second wire. This narrowest point defines the reed throat dimension.
- Tube section and flare (a.k.a. Governor flare, Louis Skinner terminology). The tube section increases in width toward the butt.
The simplest reed shape is based on one single curved line (concave shape) commonly referred to as a Knockenauer shape. The next simplest shape is the straight line style where two lines intersect at the waist. The components of straight and curved lines can combine up to eight elements for compound shapes. The Eubanks/Maxym shape (not shown in the Fox Bassoon Shapers document, below) is one that combines eight elements. Some shapes including the E/M shape include a bulge in the tube section rather than a flare to the butt. One notable type is attributed to Klaus Thunemann possible experimental shape.
<Insert contrasting shape diagram>
Notice the differences in these two reed shapes in both the belly and the position of the “waist” (narrowest point of the shape) as well as the tip width.
Reed shapers come in two designs: flat and folding. Flat shapers, also called straight shapers, are available from Fox Products, Rigotti, Prestini, and others. Folding shapers are available from Rieger and others. Each type of shaper has its advantages and disadvantages for the reed maker.
Click here to see a PDF of shaper designs from Fox: Fox Bassoon Shapers. Note: This catalog is out of date, but shows the scope of different shaper designs and dimensions. The included dimensions are tip, waist, and butt width, and distance from tip and butt to the shaper’s waist. For more information on the newest shapers available, contact Chip Owen at Fox Products.
Click here to go to the shaper page at the Rieger website: Rieger Shapers. Note: The only dimensions shown on the Rieger site are tip widths with no indication of shaper style. It is difficult to ascertain from the drawings what you are getting.
For more information, see the Introduction Q & A page.
Anatomy
In the woodwind family, the bassoon reed is the only one that does not have fixed elements in the throat and chamber that passes into the instrument. Therefore, it is very important in reed making and tuning adjustments to maintain consistency from one reed to the next in the size and shape of the reed throat and chamber leading to the bocal. Because reed cane shrinks and bocal insertion can distort the chamber the dimensions should be checked regularly by measurements with throat mandrels. To maintain these dimensions may require the use of specialty reamers to cover the area of the throat and chamber.
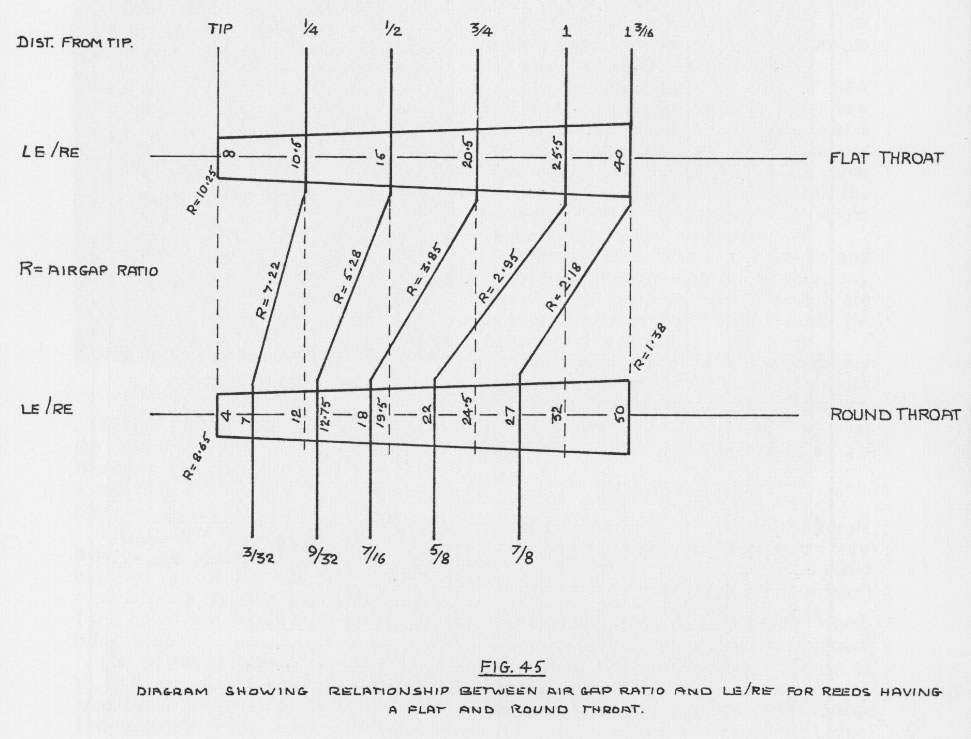
Air Gap Ratio
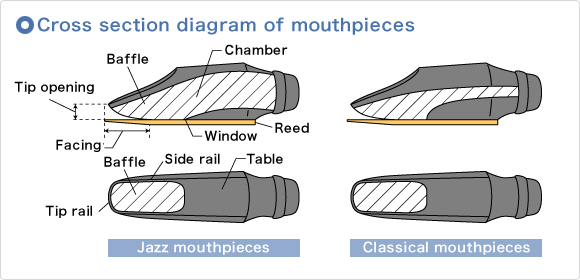
Thomas Palmer’s article called A Study of the Air Gap Between Blades of a Reed illustrates through photographs and graphs the relationships of the throat shape to the internal blade volume which is similar to the internal baffle of single reed mouthpieces.
 |
 |
 |
Bassoon Reed “Ligature”
With single reed mouthpieces, it is possible by moving the ligature toward or away from the tip of the mouthpiece to change the tuning of the harmonics and overtones. Yes, if you are a saxophonist it makes sense to check your harmonic fingerings using the lowest notes (Bb, B, C, C#, D) to prepare their tuning to the standard fingering just as we do on bassoon. This is a single reed instruments method for checking false pitch as described in Quick Guide. Moving the ligature backward on a single reed mouthpiece always improves low register response and moving forward improves high register response. This would be similar to moving the first wire of the bassoon reed forward or backward, changing the pitch of the reed’s crow.
Here is a great idea to make quick adjustments to the bassoon reed just as single reed players can adjust the snugness and location of their ligature: Bassoon Reed Ligatures, by Terry Ewell.
Throat and Chamber Measurements and Reamers
It is important to maintain consistency in reed forming at the narrowest point of the tube near the second wire in the reed’s throat. To measure this use a drill bit, “drill rod” of different sizes or throat mandrel that will fit into the throat of a reed. A scratch awl can be used as well by creating marks on the shank for different sizes. By measuring your best reeds, you can determine what size is best for you and your reed shape. Obviously, tube sections of reed shapers that are narrow will require smaller “throat mandrels” to measure internal diameter. Use larger “mandrels” on larger tubes.
In most cases, reeds will shrink in this critical section between the narrowest point of the throat and the tip of the bocal. This area must be maintained by the use of a throat reamer which can be a modified standard bassoon reamer or a “taper pin” reamer of the appropriate size. If not maintained, continuing shrinkage can reduce or shut down flexibility in the middle register notes from open F to high F. It is also important to check if the repeated penetration of the bocal has created burrs of cane which are blocking the chamber area’s air flow into the bocal tip.
Fixed Chamber Reed Making
Another way to maintain the chamber between the throat and tip of the bocal is to insert a fixed-diameter tube into the reed when it is formed. It is NOT possible to add this element after forming the reed. This is a new development from Arundo Research that has proven over the last two years to maintain consistency of the reed as they age. For more information, see New Research.
Blade Profiles
Initial Blade Profile
Some commercially available shaped and profiled cane is far too thick in the blade area to vibrate when the tip is clipped open after forming. This can be the case even with the use of a tip profiler. However, some profilers (called full blade profilers) are capable of reducing the thickness to produce a playable reed. For one prominent bassoonist the initial blade profile is played during the break-in period and then the blade is profiled a second time to its finished dimensions.
Irregular or Sculptural Blade Profile Design
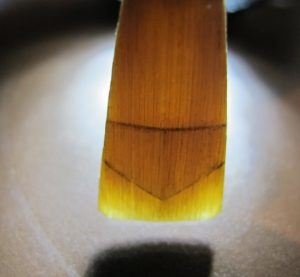
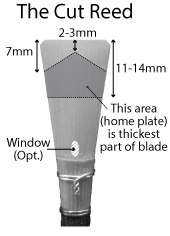
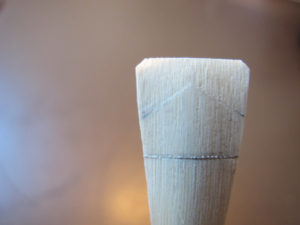
The Cut Reed
How to save your “ass” (embouchure) for a really long blow: the cut reed (a.k.a. the continuo reed). If you are playing a long oratorio such as the Handel’s Messiah or chamber music basso continuo, this reed design is essential to save your chops. For some it may also prove helpful in big, long symphonies like Brahms, etc. This reed design is commonly used by Los Angeles studio players who must play long, sustained, soft parts in movie scores. Although the reed can play softly it also works at moderate dynamics and solos such as the opening of the Rite of Spring. This style of reed has been traced back to 18th century reeds.
Note: a cut reed can sound different in its overtones to the player, yet to the listeners there is no real perceived difference in the sound.
See also the article by Julie Feves, A Practical Approach to Reed Design.
 |  |
|---|---|
 |  |
Gouge and Cane
Isn’t it a shame that we buy gouged cane in bulk with no idea whether the cane will be hard enough to produce a viable reed. Single reed players can buy cane rated for hardness from multiple sources, with multiple blade styles. Hardness is one factor in gouged cane but there are several other considerations that will affect the outcome. How much would you spend on a piece of cane to guarantee that it not only met your hardness requirement but other measurable components as well?
Simple Cane Tests
Thumbnail Test for Cane Hardness: Can you easily indent the outer surface (rind/bark) of the cane with your thumbnail? If you can or if the cane has a corduroy rough texture on the bark the cane should be rejected because it will be too soft.
Twist Resistance Test: Using shaped and profiled cane that is dry, hold the ends of the cane and rotate the cane, twisting back and forth. If the cane can be twisted 90 degrees or greater, the cane should be rejected due to lack of resilience.
The Rock and Roll Test: With shaped or shaped and profiled cane, place on a flat surface with the bark/rind surface facing down, press down on the right and left sides of the blade section of the reed shape to see if the cane rotates equally to the right and to the left. Also check to see if the cane is leaning to the right or left rather than sitting centered on the cane’s shape. If the cane rocks more to one side that to the other or does not sit centered on the flat surface, the cane’s gouge is not symmetrical or the shaping of the cane is off-centered with the thickest part of the gouge not exactly in the middle of the shape. This assumes that the cane is gouged using a concentric gouge and/or the radius of the cane is symmetrical. If non-symmetrical cane is used it will make a non-symmetrical tip opening with cane that is harder on one side of the reed than the other. See example below in Tip Openings.
Tip Openings
Non-Symmetrical Tip Openings
Non-symmetrical tip openings create special problems in reed tuning. The ideal reed when clipped open, has a symmetrical tip opening of a particular style which is defined by critical reed design components and careful construction. Poor tip openings result from many different failure factors.
Symmetrical Tip Opening Variations
Tip-to-Tube Ratio
James Kopp, a well-known teacher of reed-making theory and techniques, describes variations in tip openings in his article Tube, Tip, and Aperture: The Functional Geometry of your Bassoon Reed. Kopp defines the relationship of the tip opening to a tip-to-tube ratio as follows:
“The tip-to-tube ratio… refers to the width of the tip (of the finished reed), divided by the width of the tube (measured with a caliper above the collar (when present) or first wire. Most such ratios will fall within the range 1.5:1 to 2:1. For example, a tip width of 15 mm, divided by a tube width of 8.5 mm, gives a ratio of ca. 1.76. (Calculating the exact ratio is less important than understanding this general principle.)
Kopp goes on to state:
“Apertures have traditionally been described along a spectrum, its extremes being a wholly convex shape (traditionally called “French”) and a shape with “collapsed corners” (traditionally called “German,” although these stereotypes are now outdated). To speak in dichotomous terms, a convex shape has a lively sound and a sudden attack, while a shape with collapsed corners has a more subdued sound and more resistance, making the attack a more deliberate process.”
As stated in the Quick Guide, “…the style of tip opening can be a strong personal preference in blowing resistance”. The type of tip opening is also a function of the type of gouge and blade profile and taper as well as the degree of warp in reed forming. Each element effects blowing resistance, resonance, and response. Lack of consistency in cane hardness and reed construction are further complications which limit consistency in reed tip apertures.
Climate
Your reeds will need to be adjusted to fit your location, be it high altitude, high humidity, or high temperature. Failure to make these adjustments prior to performance could result in performance failure.
Bocals
Errata: The dimensions listed in Paragraph 3, sentence 3 state “A typical bocal opening is 9.65–9.75mm.” The correct dimension is 8.65–8.75mm. This dimension can be slightly larger on some modern Heckel bocals, up to 9mm. The authors bassoon bore opening is 9.1mm. Older bassoons can have a smaller bore opening and may not be well suited to newer bocal designs.
How to Test a Bocal
Bocals can confound tuning! In 35+ years of selling new Renard and Fox bassoons, I have never seen anyone pick the bocals that came with the bassoon when given a choice of trying several bocals of the exact same type (bore, metal type and plating, and length). Unfortunately, this means every bassoonist should be on the lookout for a bocal that plays with a balanced scale, a satisfying tone, and good tonal projection. It is easy to be seduced by a bocal that feels great to play but may be missing the essential ingredients.
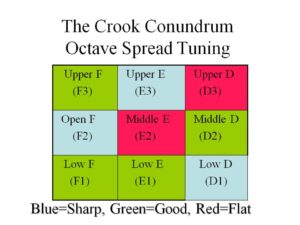
As you can see in the graphic below, the notes D, E, and F can be at, above, or below the general pitch level of neighboring notes. Obviously, the ideal bocal would have all nine notes centered at equal temperament. For some bassoonists, high G (G3) is also a factor in bocal tuning with a preference toward Heckel B bocal bores over C bores. In picking bocals, also check low G (G1). A bocal that is extremely flat on low G should be rejected immediately. The Quick Guide shows a reed tuning method that helps adjust tuning of the middle register.
How to test a bocal using the test note sequence.
 Bocal Modifications

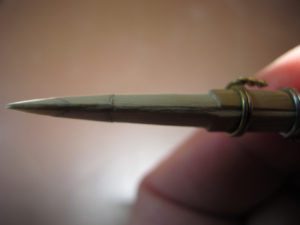
Another method of bocal tuning is modifications to the bocal tip. This is done by reaming the tip opening and/or swedging the bocal tip. Swedging is a method to reduce the tip opening diameter and is also helpful in rounding a damaged bocal tip. This can be  accomplished with a hose nozzle (as shown on right). Be sure it is one made of metal. Rotate the tip of the bocal forcefully into the nozzle from the nozzle’s big end to reduce the bocal’s tip diameter. You may want to use your reed reamer in advance inside the nozzle to establish the same taper. If the bocal tip has a blunt thick leading edge, carefully ream the opening first. Reducing the diameter of the bocal tip will help raise the pitch of the middle register. The average diameter of the bocal tip opening is 4.0mm. Heckel bocals with the designation “E” as in CCE, CE, CDE, etc. are smaller in diameter (3.8mm or slightly larger).
Modifications to the larger end, the exit of the bocal, are described in the Quick Guide to Bassoon Reed Tuning, pg. 5. These modifications will move the pitch positions of notes in the middle register and increase or decrease blowing resistance depending on the adjustment made.
If the big end of the bocal exit diameter is bigger than the opening of the bore of the bassoon in the wing joint it will add unwanted resistance. It is common after years of playing for the opening to the bore to become frayed. In this case the bore opening is reduced. Removing the worn edge from years of abrasion at the bottom of the “well” where the bocal is inserted will effectively enlarge the opening of the bore, reducing resistance. This is more common in polypropeline bassoons with softer plastic in the well than wooden bassoons lined with hard rubber. It is possible to swedge and reduce the diameter of the large end using a special tool.
The Bocal Cocktail
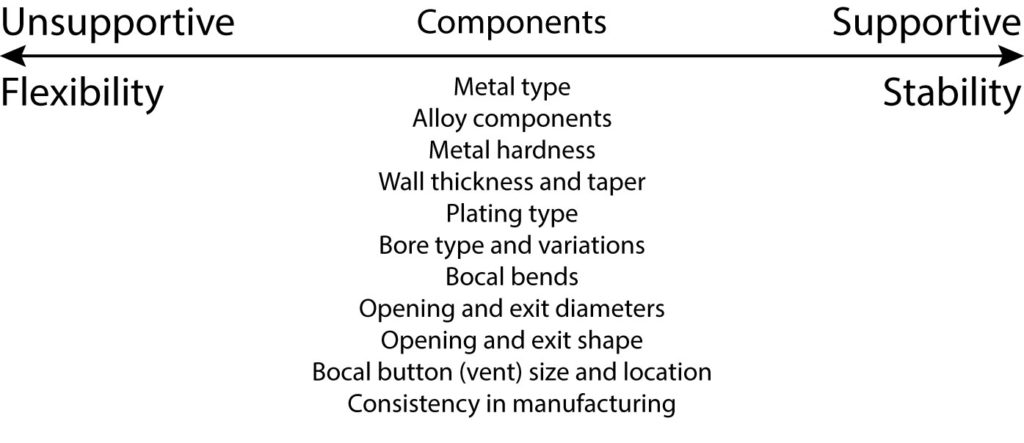
Components that Contribute to Pitch Stability and the RRRR’s for metal bocals
For more information, see the Introduction Q & A page.
Curses
It is common to hear a bassoon tone that has distortion. “Kak” (sh*t) can happen in any register on the initial attack. A sustained tone can also produce a sizzling sound like bacon frying or a whistling effect. This problem is not unique to the bassoon, but is common to all reed instruments as air leaks between the reed blades or reed and mouthpiece when the aperture is completely closed. In some cases the sizzle only becomes audible at soft dynamics or diminuendos to nothing. Both kak and sizzle can be corrected by carefully balancing the tip of the reed.
In the middle register, distortion is more of a problem. It can be upon attack, or tonal instability producing a split tone often referred to as “croaking”. Repeated articulation can be sluggish or distorted for most notes within the F#2 to F#3 octave. Croaking is commonly caused by imbalances or a dip behind the tip of the reed. The ideal reed can overcome the bassoon and bocal’s acoustic deficiencies. In come cases it is better to discard a reed if you can’t get rid of kak, sizzle, crack, croak, or whistle.
Curses of Bassoon Manufacturing
Despite claims by bassoon manufacturers that their instruments are tuned between so many cents at equal temperament for the entire range of the instrument, why do bassoonists end up putting tape in tone holes?
During rehearsal a player was stopped by the maestro who said, “You are playing out of tune on your A.” The player said, “But maestro, my instrument was just tuned at the factory.” The maestro replied, “Send it back!” (This actually happened in a Seattle Symphony rehearsal in the 1970’s, Milton Katims conductor.)
Was it the instrument, the reed, the player, or his mouthpiece? Can an instrument be tuned at the factory and work for every individual musician? You stand a much better possibility of an instrument that is well tuned at the factory if you play any woodwind other than the bassoon (and probably the oboe). The bassoon and the bassoonist need a great deal of help from their reed, their bocals, and consistency from bassoon manufacturers. Many older bassoons deficiencies are so troublesome that players must resort to embouchure gyrations and “rubber reeds” and tuning tape. Pad heights overall are often too high, especially on the bass bore. Many bassoons also require tone hole manipulation, usually making them larger. Rarely is the use of tuning tape required on modern instruments that are in good playing condition. Is your bassoon cursed with leaks?
Bassoons and Bells
The bell of the bassoon not only determines whether an instrument is really good in the low or high register, but also helps define the tone quality of the instrument. Changing bells can be an eye opener for these elements but also in the tonal projection of the instrument.
Another significant element in tuning the bassoon to the individual player is the U-tube. Unfortunately, bassoonists are not aware that a U-tube can have a significant impact for the player as much as a bocal and costs less money. Players report that changing the U-tube opened up the sound, added projection, and generally improved the feel of tone production. The change produces a qualitative improvement for the player, if only you can get your hands on a bunch of U-tubes to try!
Want more? Click here for Introduction Q & A