
Every bassoonist should take it upon themselves to care for the bassoon through basic maintenance. This involves regular cleaning of bocals, tone holes, and removal of dust and reed shavings from the body of the instrument. The instrument should be swabbed in the wing and boot joint after every playing session before storing it in the bassoon case. This is not the case for most school bassoonists who throw the bassoon into the case as soon as the bell rings, failing to swab the bassoon, and not taking care to avoid damaging the key mechanisms, specifically the whisper key and bridge key on the wing joint. It is not recommended to lay the bassoon down on the bassoon case during breaks or intermission. If the bassoonist does not have a bassoon stand the instrument should be swabbed before laying it down. The bocal should be removed if the bassoon is laid down to avoid accidental damage. Many bassoonist place the bocal in the bell when the bassoon is in the stand or when laid down.
As a bassoonist you should be the last one leaving the band room or the stage because of the care you are taking to remove moisture from the instrument prior to putting the instrument in the case.
How the bassoon is assembled can also be a problem, especially if the bassoon has a whisper key lock. If the whisper key lock is on when the bocal is inserted the whisper key pad can be torn or damaged in the process. This is more common with the left hand thumb whisper key lock adjacent to the whisper key itself.
Some bassoonists push both the long joint and wing joint into the boot joint at the same time. The proper procedure is to place the wing joint in first, twisting it into position for proper alignment with the bridge key from the wing joint to the pancake key. Then insert the long joint, twisting it toward the wing joint to its stopping block on the long joint. The bell is the last piece to be attached. Attaching the joints to the bassoon should meet with some resistance when twisting into place to avoid possibility of the bassoon falling apart and crash to the ground. The bassoon should never be held up by the bell and whenever possible picked up by both hands to avoid separation from the boot. If the joints are loose on the bassoon, use thread or dental floss, wrapping it around the tenon (the part that you insert into the boot joint) to make it a tight fit.
Once the bassoon is assembled, insert the bocal and check if it also has a tight fit. Be sure the lock is off. Insert the bocal with the fingers wrapped over the u-shaped curve, gently twisting until it is fully inserted. (Don’t leave the bocal partially inserted as it will effect the playing of the instrument.) With the bocal inserted check that the whisper key closes completely and easily with the pancake key. If it does not close the whisper key completely, the wing joint should be rotated clockwise until it closes. It is important to also check that the pancake key closes easily without resistance as the whisper key closes at the bocal. If the pancake key resists closing easily, then the wing joint must be turned counterclockwise until the pancake closes easily. If there are problems with either closure of the whisper or pancake keys, the bridge key may be damaged needing a simple repair by adding tape. It is common for the bridge key to be accidentally bent by careless assembly, disassembly or placement into the bassoon case.
Future video of assembly and adjustment of the wing joint and bocal closure coming soon.
Bassoon Leaks
The bassoon is prone to leaks and adjustment problems. Band instrument repairmen are not properly trained in bassoon repair, often using brown saxophone pads instead of the white goat skin pads. They also lack an understanding that there can be multiple sources of “mystery leaks” especially on wooden bassoons. The best repair shops and all double reed repair shops will have pressure testing equipment called the “Mag Machine”. Every Fox bassoon released from the factory has its final check on this pressure testing device. Some repairmen believe that suction testing is effective but this is a fallacy. Pads can be sucked down to form a seal but when pressure is applied, they will lift up and leak. In the “old days” (before pressure machines) repairmen who smoked cigarettes would blow smoke into a sealed bore (closed keys and plugged on one end) to see where the smoke was escaping. Yuck!!
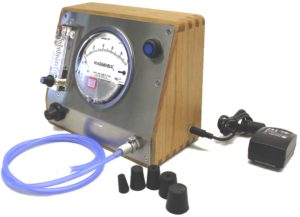
Notice in the image below that there are several rubber stoppers. In pressure testing, each section of the bore should be tested separately. The open ends of the bore are plugged with rubber stoppers, one of which is attached to the rubber hose of the Mag machine, feeding air pressure into the bore. The meter registers how much air is holding inside the bore. If the bore is without leaks, the meter on the machine will go to zero. Moderate leaks will register with higher numbers and if there is a major leak the needle may not move at all. To pinpoint leaks at the pads while the pressure is on, individual pads can be pressed down to see if the needle moves towards zero. It is most effective to cover the open tone holes of the wing and boot with poster putty to ensure that there are no leaks because fingers can leak, too! For best results, all pads/keys should be removed and all tone holes covered with poster putty and pressure tested to see if that section of bore holds air without pads/keys on. What if the meter does not register zero with all tone holes covered with poster putty? This can be a common problem with older bassoons. There are a number of possible “sneaky leaks” with air escaping around posts, through cuts in the wood, through missing varnish, and through action rod holes. But the most common leak on all bassoons is at and around the u-tube. To diagnose sneaky leaks, the mystery can be solved by immersing the joint underwater with the pressure on to see if bubbles of air show up. Finding and sealing the mysterious sneaky leaks is well worth the effort.
Mag Machine
How to Test for Leaks
Typical Repair Problems
- Missing or cracked whisper key pad.
- Whisper key pad doesn’t close.
- Bridge key from pancake key doesn’t close whisper key.
- Bent or cracked bocal.
- Bocal tip is out of round.
- Bocal cork is cracked or loose.
- Loose joints.
- Ring key leaks.
- Sticking or stuck pads.
- Dirty pads.
- Stuck or sluggish keys.
- Pad heights out of adjustment.
- Springs pop out of position.
- Dirty tone holes or bocal.
- Stuck swab.
Sticking or Stuck Pad
Sticking: A normally open pad hesitates or won’t open. For example: You are playing low G and you lift your finger to play A, but it stays on G temporarily.
Stuck: A normally closed pad is stuck shut. For example: Low Ab pad will not open when key is depressed.
Solutions:
- Always swab moisture out of bore and tone holes using a bassoon drop swab (pull through).
- Keep tone holes and pad seats (wood surface) clean. (Solution #7).
- Clean pad’s skin. May require key/pad removal. See Solutions #1, 2 and 7.
- Increase spring tension or re-attach spring.
- Check alignment of rod to pivot screws or fix twisted posts. (Solution #13)
- Lubricate rod pivot screws.
Causes:
- Moisture in tone hole
- Wet pad has dried and stuck to tone hole
- The key’s rod is bent or its post has twisted
- Weak spring tension or detached spring
A normally closed pad is not completely closed
Example: Ab, Bb pads.
Causes:
- Weak spring tension or detached spring.
- Action rod is too long.
- Key lever is bent out of adjustment.
Solutions:
- Increase spring tension or re-attach spring.
- Check alignment of rod to pivot screws or fix twisted posts. (Solution #13)
- Lubricate rod pivot screws or hinge rods.
- Check action rod alternate key adjustments.
Ring Keys
Problem: 3-fingered C or neighboring B are sharp or unstable.
The high G vent key pad is not completely closed. To diagnose this problem, tap on the ring key pads which should be closed.
Problem: 2-fingered D is very sharp or unstable.
The high B/C vent key pad is not completely closed.
Causes:
- Spring is off or broken.
- For high G vent, the cork or felt shim is missing or out of adjustment.
- For B/C, the vent is accidentally activated by the C# key or high B/C register key lever. There should be a space between the contact arm and the lever below.
Solutions:
- Increase spring tension or re-attach spring.
- For high G, add “sticky note” shims (Solution #3) between the lever from the F key and the G ring key lever.
- Bend the B/C register key and/or C# key upward to leave a gap between the contact arm and the lever below.
- Check alignment of rod to pivot screws or fix twisted posts. (Solution #13)
- Lubricate rod pivot screws.
Cork or thread binding on wing joint or base joint is too loose
Whisper key pad doesn’t close for low notes
Whisper key pad is cracked, loose or missing
High B vent stays open
High G vent stays open
Loose joints
Typical problem on wood bassoons with string bindings.
Bocal Repairs
WHAT YOU DON’T KNOW ABOUT BASSOON BOCALS
Question: How do bassoon bocals get holes or cracks in the metal? (They look like a solid tube of metal. Is there a way to test if there is a problem and how to fix it?)
Answers: The most common indication that a bocal has a seam leak is that the lowest notes of the bassoon won’t play, similar to a whisper key pad that is not closing completely at the bocal, or the pad is cracked or missing. If it’s a big leak at the bocal the bassoon seems to have a major pad leaks or is basically unplayable getting worse going down to the lowest notes.
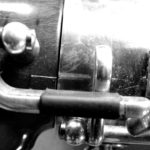
Regarding whisper key problems which can mimic a bocal seam leak problems…In some cases the metal cup that holds the whisper key on to the rod is bent making it impossible to close completely. And more commonly the “bridge” key between the wing joint (upper section) and the boot joint (the double bore section) does not close the whisper key completely when the low E “pancake” key is closed. Both problems will cause difficulties on the lower notes.
Assembly of the bassoon can be the cause of this issue. The bridge key is often bent out of it’s correct position by improper assembly of the bassoon, or more often not lining up the assembly to the marks on the wing and boot joint found on all Renard and Fox bassoons. The L shaped bridge key may simply need to be wrapped with electricians tape if it has lost the black “shrink tubing” that covers the end of the L to help key the whisper key closed properly. Abuse in assembling the bassoon, twisting it too far around or rough handling in returning it (throwing it into) the case can bend the bridge key or the whisper key. Adding more tape to the L is often the needed fix.
Bocal Seam Leaks
Test 1. Testing a bocal for seam leaks is simply a matter of using a suction test. Seal the large opening and bocal button vent hole with fingers and suck the air out of the small end. It should hold the suction. One method is to place the end of the tongue on the small end after suction is applied and then open the mouth. The bocal should stick to the tongue unless the bocal is leaking. It should hang on to the tongue.
Test 2. This is the best way to confirm and find the location of the leak. Place the fingers as above, but blow hard into the bocal to see if it holds air. This test may cause you to hear air escaping or not. To find the leak location, immerse the bend of the bocal in a container of water that will fit the bend under water and blow while looking for a bubble or bubbles along the bocal seam.
Test 3. To see if there is a cracked seam at or near the tip of the bocal, immerse the small end under water with the small end plugged, plug the bocal vent and blow into the large end. Looking for bubbles near the tip of the bocal. The thin metal at the end of the bocal is often “dinged up” has a flat spot from dropping the bocal on its tip or rough handling in the case, etc.
Damage. When bocals are dropped onto a hard surface the bocal may become dented somewhere along the length of the bocal leading to a crack or a major distortion of the tip opening that should be corrected by carefully rounding the metal. A bassoon reed mandrel may fit inside the tip and allow for careful rounding by slowly rotating the madrel into the opening. Very carefully!
About bocals, problems and their maintenance.
Bocals are made from a flat piece of metal that is formed around a tapered forming “mandrel”. The seam is soldered using a soft silver solder. The solder and the bocal’s metal is subject to corrosion, tarnish etc. , Some individuals have a strongly acidic saliva. These individuals also will cause bassoon’s keys to erode too from the excessive acid on their skin.
If the bocal is not cleaned out on a REGULAR basis, nasty bacteria can also build up inside from food debris and saliva which also attacks the metal as well as the seam. It can be really gross inside there and actually a health problem. More so if a bassoon is shared in a school system by different players.
Cleaning. I prefer to use a bocal cleaning brush over a pull through bocal swab. It’s best to clean the bocal when it is wet inside or wetted for cleaning. A mild abrasive like Bon Ami can be used too. Be sure to also clean out the bocal “button” whisper key vent hole with a tine piece of wire, straw from a broom or whatever will pass through the tiny hole.
Gunk inside. I’ve seen bocals that were coated with a black substance in side. Either the bocal had a build up of tar from it being used as a pipe for smoking pot (I’ve seen that), or it is the substance used inside the bocal when the bocal was manufactured that allows the bocal to be bent to its finished bends without crimping or making it “out of round”. Sometimes this material is not completely cleaned out.
Manufacturing Flaws. The soldered seam can be thinner in some places than others, a manufacturing flaw is not common, but does happen. Same problem with the bocal button which may not be securely soldered, or the vent is clogged. A clogged vent can cause “croaking” on the the middle register notes.
Bassoon cases. Bocals are stored in the old fashioned cases with the seam side down (bocal button facing up), so if left without blowing out the moisture inside before placing in the case, the bocal sits in contact with moistureon the seam until it drys out, or not.
Damage to the bocal by the player or ? Bocals that have large open cracks along the seam may be the result of several issues, 1) the cork is too tight requiring excessive twisting effort in getting it down into the bocal well (cork grease is yucky, Vaseline gel is best),causing the seam to crack open 2) the bocal insertion is not done carefull or properly with the hand wrapped over the top of the curved section of the bocal bending or crimping the bocall, 3) the bocal has been bent or crimped by improper assembly with hand on the straight section of the bocal, or 4) its been accidently bumped or kicked. Players who lay the bassoon down on their case my return to find the player next to them has given the bocal a “Big Foot Treatment” climbing back to their chair.
Repairing bocals seams. There are only a few repair technicians in the U.S. who have the skill required to repair a cracked seam. The best solutions is to melt the solder along the whole seam of the bocal. Resolder it completely and then replate the bocal with nickel or silver. The plating gives some extra strength to the seam covering the solder.
The patch. What about putting a metal patch over the area of the cracked seam? This is a common woodwind repairman solution. Unfortunately this deadens the bocal causing it to not sound the same and it will not feel the same in playing. The seam is solid, but at what cost?
Quick Fix? Are there quick fixes? Black (somewhat stretchy) electricians tape will take care of the problem and not effect vibration. A less visually disturbing method that is very successful even with large open seams is to cover the area with a quick drying epoxy. If there are only tinly holes or thin cracks smear the epoxy along the affected area and apply suction to “pull” the epoxy into the crack. Avoid breathing the fumes as best you can. I don’t think it will kill you. I’ve played bocals that have have multiple layers of epoxy applied that played great. One in particular was a very old Heckel bocal with an open seam and where the metal edges of the seam were quite thin. A wonderful bocal to play. A complete seam resoldering was done without plating. It still played very well but not as great as it used to be.
Instrument Repair Shops. The REALLY bad news about these common bassoon problems is that it can cost you big bucks! Things can be much made worse with a mystery leak at the bocal or instrument or your pocket book.
Almost lost their shirts.! At this moment I have a bassoon here with a cracked bocal seam. It was suggested that this bassoon that didn’t play the low notes at all might be taken to a nearby music store with a repair department to “check it out for a bent key. The shop’s verdict: The bassoon has leaks and needs a complete overhaul. Cost $550.00.
When I heard about this I implored the parents to get the bassoon out of that shop and back home. I met the father with bassoon, did a quick pressure check of the wing, boot and bass joints (by hand and mouth, not that difficult) and determined that the bassoon did not have a significant leak problem and next checked the bocal. Sure enough. A significant leak there at the seam. If they had spent the money for an overhaul repair they would have spent more than the paid for this bassoon when it was purchased (used). It is not a great bassoon, a cheap Chinese attempt at a bassoon. If they had done the overhaul, the bassoon probably would have been returned with the same issue and now decked out with brown saxophone pads which are totally the wrong pads to be on any bassoon. Because they leak too! Would the shop have checked the bocal to see if it had a leak at the seam? Probably not. The repair “technician” probably doesn’t know who to play a bassoon or assess it.
They lost some $$. My own sad story. I sent my wonderful old oboe to my granddaughter whose school instrument was a mess. Before sending it I used my woodwind repair pressure checking device and found that one pad for the alternate F key had a leak. Only one leak, one pad. When they went to Ted Brown Music in Tacoma she was told that the oboe needed an overhaul. They did a sales job on her and mom (my daughter) not taking my advice. When they picked up the oboe it played worse that when it was brought in for the “unnecessary” overhaul. Three trips later and with the help of involvement by an oboe teacher pro player, the instrument was again made playable.
Music stores make more money on repairs and instrument rentals than selling new instruments. Many shops have the policy of not replacing a pad or two, but rather replacing all the pads. And, unfortunately, you will need to leave your instrument for weeks and sometimes months before they get to it. What do you play on while it’s at the shop? What if you have a concert coming up? Will they let you borrow an instrument or rent one from them? Most shops that do repairs have a minimum rate of $60 per hour. One pad $60, good deal.
Preventative Maintenance Measures
Repair Tools and Techniques
| Solution No: | Options | |
|---|---|---|
| 1 | Paper currency (the older 'n dirtier the better!) Use paper currency on sticking pads. Place the bill between the pad and tone hole, press down firmly to close the pad, and pull out the bill. Older currency has oils in the paper from handling the bills over time. If possibly, try pulling the currency in different directions several times. If this is insufficient to stop the sticking pad, see Talcum powder, below. |  |
| 2 | Talcum (baby) powder For the worst cases of sticky pads, sprinkle the powder on the currency or on a piece of paper and again pull the paper out from under the closed pad. |  |
| 3 | Self-adhesive (sticky) notes or stick-on labels Paper shims are used to regulate pad heights. In some cases where cork or felt are used as pad or key stops, this material may be missing having fallen out. Paper shims can be used as replacement material built up in layers for either pad height regulation or missing felt or cork. In some cases this missing material can cause the ring keys (L.H.3 and/or R.H.2) to stay partially open in their connection to the vent keys for high B and C venting pad (L.H.) or R.H. high G vent pad. |  |
| 4 | Swiss-Tech and small screw driver kit Bassoon keys require two different sized screwdrivers for the pivot screws and rods. The Swiss-Tech combination plier and screwdriver can be used for reed wire adjustments and removal of pivot screws. Note: small-tipped screwdrivers will not fit well into the slot of pivot screws. The inexpensive Swiss-Tech tool is not only handy for the above mentioned tasks but can also pull out rods that connect keys to posts. However, to remove the pivot rods between posts requires a smaller screwdriver tip such as the one shown, a standard woodwind specialty tool. Be prepared with both tools unless you also want to have a larger screwdriver for the pivot screws. Sewing machine screwdriver sets may be suitable. |  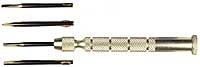 |
| 5 | Rubber bands Rubber bands can substitute for a missing or broken spring that would keep a pad open or closed. These can be tricky to adjust, but what else can you do in an emergency? | 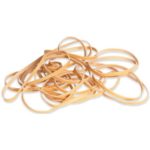 |
| 6 | Waxed dental floss (round/heavy) It is not uncommon for the cork on the bocal to crack away or fall off. It is also not uncommon for the cork or string on the tenons of the wing joint or long joint to become too loose to be securely attached to the boot joint. The solution is to wind waxed dental floss as a substitute for the missing cork or to help create a snug fit for the loose tenon or bocal. Another solution is to use thread (such as DMC #8 cotton perle) that has been waxed. This is the same type of thread used on Fox and Renard bassoon tenons and is waxed after it is wrapped with paraffin (candle) wax. Note: never use cork grease or petroleum jelly on threaded tenons. It will disintegrate the cotton fiber over time. Use wax! | 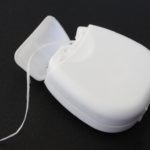 |
| 7 | Cotton swabs and pipe cleaners Cotton swabs are used to clean and remove moisture from tone holes. Pipe cleaners are used to clean small vents and tone holes that are too small for cotton swabs. A second use of pipe cleaners is to clean dirty pads which may have reed shavings or grit on the skin of the pad. Use with water or rubbing alcohol. | 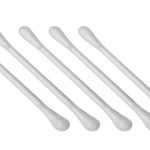 |
| 8 | Teflon tape (plumbers tape) Teflon tape can be a substitute skin for a cracked pad. | 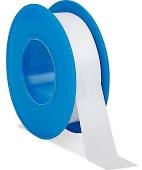 |
| 9 | Disposable lighter If a pad falls out, a lighter may be used to heat the pad cup to soften the adhesive enough to secure the pad in the cup. It may be difficult to realign the indentation of the pad to the tone hole "seat." | 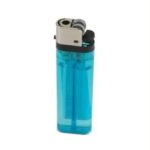 |
| 10 | Electrical tape It is common for the bridge key from the wing joint to be bent out of alignment. If bent, closing the pancake key may not close the whisper key pad at the bocal. Wrapping tape around the bridge key lever can be the solution. Note: shrink tubing may also be used. |  |
| 11 | Brass wire (22 gauge) It is a good idea to have a few pieces of brass wire of 22 gauge in case a reed wire needs replacement. And it is the right size to clean the vent in the bocal button. |  |
| 12 | Cosmetic brush Many problems with pad leaks are attributed to reed scraping debris, animal hair (don't let them sleep in your case!), and dust. Use the soft cosmetic brush to keep the body of the instrument clean to prevent migration of debris onto pads. |  |
| 13 | Quick Drying Epoxy Use epoxy to afix loose posts which have twisted away from correct alignment between the pivot screw and the rod usually caused by spring tension. Can also be used to seal cracks in a bocal. | |
| 14 | Super Glue | |
Sandpaper strips

F Key Pad Sluggishness
Possible causes:
- Dragging on the linkage from the F key to the High G vent key. It can be metal to metal, or cork.
- The F key is dragging on the F# pinky key when it comes up.
- Dragging from the action rod from the F# thumb key or the rocker key from the F# pad.
- One of three springs is out of position: High G vent, the F key touch/spatula, or the F key pad.
- One of the three springs is off the spring hook, missing, or is too weak. The strongest spring should be on the F pad and it should close the G ring key and the F pad by itself.
- F key rod is binding against twisted posts (top or bottom) which are rotated out of position. Rotate the post back into position with a pair of small needle-nose pliers for proper alignment and apply some superglue around base of post onto the wood.
- Hinge rod for the F pad is bent or the rod tubing is bent. Using a screwdriver, rotate rod 90 degrees. Notice if the pad moves when rotating the rod with the screwdriver. Find a position (the sweet spot) where the pad does not move.
- F pad is sticky. Clean with a dirty dollar bill. Place the bill under the pad. While holding the pad down firmly, pull out the bill. Or put talcum powder on the bill or a piece of paper and use the same procedure.
- Spring from the G key adjacent to the F pad cup (Renard and Fox bassoons) is out of place and drags against the F pad.
G Key Pad Sluggishness
Possible causes:
- G pad is sticky from moisture in the bore getting on to the pad. (This is the most common problem.)
- Action rod that passes through the body of the bassoon is sticky. It runs from the G key to the G pad. Sometimes action rod hole is too small or full of gunk.
- Bent hinge rod for the G pad or bent rod tubing. Using a screwdriver, rotate rod 90 degrees. Notice if in rotating with screwdriver the pad is moving. Find a position where the pad does not move. Find the sweet spot.
- The cork or felt that touches the action rod can be binding with the rod itself.
- The G key can be binding with the rod for the high G vent.