The Fixed Chamber Reed
All single reed instruments and the oboe have a fixed “chamber” in the bore in the mouthpiece/reed while the bassoon reed does not. The area of the reed between the tip of the bocal and the second wire can vary in diameter from reed to reed, and shrinks over time changing the performance of the reed. Over the years, I have used a special throat reamer to maintain the dimension of the tube between the end of the bocal and the second wire. Inserting a section of metal tube when forming a bassoon reed eliminates this problem. A (tapered) bass oboe staple experiment was unsuccessful even though the staple fit onto the bocal. However, a straight metal tube insert (of brass or aluminum) has given reeds consistent playing which continues as they age.
The reed shape should have a fairly wide tube to accommodate the insert without having gaps between the blade halves. Some reed shapes have a slight bulge beyond the second wire by design, which helps accommodate an insert. With narrower shapes a large chamber can be carved into the gouge as shown below to help fit the metal tube.
So far, our experiments have only included round metal inserts of differing diameters. Next, we will be experimenting with square metal inserts. Stay tuned for more information!
Preparation
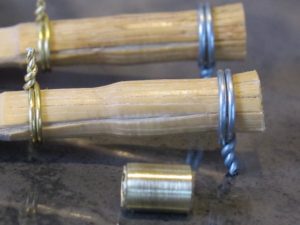
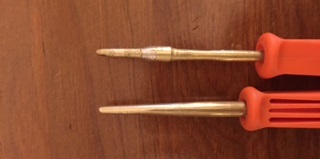
The brass tube used in the photo (below) is 7/32″ in (outside) diameter x 0.014 wall thickness. You can also use 3/16″ x 0.014 or 5mm tubing. (5mm falls in between 3/16″ and 7/32″.) Metal tubing is available from hobby shops and is available in brass or aluminum. (Note: brass tubing is more rigid than aluminum affecting the ease of tuning adjustments at the second wire.) The metal insert length is 4-6mm depending on the overall tube length of the reed’s design. The top end of the tube is placed just behind the 2nd wire position. Note in the photo below the pencil marks indicating the positioning of the insert. (The Arundo reed design calls for a 30mm tube with the second wire located 18mm from the butt.) The length and position of the metal tube should not interfere with bocal penetration or reaming the reed to fit onto the bocal. You may experience some contact with the insert in reaming depending on the type of reamer used.
The lower end of the tube insert sits just in front of the end of the bocal, a penetration point beyond 9-10mm. The tube diameter recommended above produces a large fixed throat. Medium and smaller sizes are possible as are modified tubes including a Venturi effect. A fixed chamber within the bassoon reed gives it more consistency by eliminating shrinkage and/or changes due to reaming or debris caused by jamming the bocal into the reed. A larger chamber diameter gives the reed more expressive “room” and flexibility in the middle register. Smaller diameter tubing is certainly possible. You can also “double up” by inserting a smaller (5/32″) tube within an existing fixed chamber reed to increase response in the extreme high register with some reduction of tonal output. A 1-inch piece of 5/32″ tube can be inserted beyond the metal tube into the reed’s throat, and extended out the end of the reed and inside the bocal tip. This allows for easy removal to return the reed to normal playing.
Cutting the Insert
Cut the metal tube to the desired length using a rigid tube cutter or a small metal saw (see photos below). Note: the rigid tube cutter will reduce the diameter of the tube at the point of the cut. This can be opened up by forcing the tube onto your mandrel or by reaming. (Forcing the tube onto an aluminum or brass mandrel may scratch the surface and is not recommended.) When using the saw, the resulting cut will be rough and will need to be smoothed by sanding or filing.

Pipe cutter
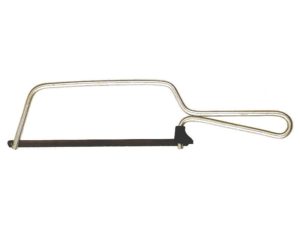
Metal saw
Positioning the Insert
Mark with pencil on the gouged surface where the tube insert will be located. The location will be just behind where the second wire will go and beyond the point where the bocal will be inserted into the reed. In the photo below, the pencil marks are at 18mm and 13mm from the butt of the reed. This assumes a metal tube of 4-5mm with a maximum bocal insertion of 10mm. Note: the Arundo reed design calls for a 30mm tube with the wires at 27, 18, and 6mm from the butt. If your reed design calls for a shorter tube length or different wire positions, then these positions and tube insert lengths will need to be adjusted for a proper fit.
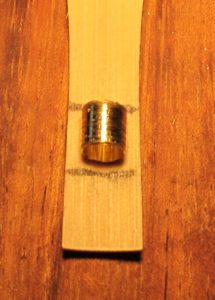
Metal tube location
Area scooped out of gouge
The photograph (above) shows an area scraped away from the gouged surface using a small radius scraper tool, such as the ProPrep #200 with a small pointed channel scraper blade (on the left in the photo below). This allows the section of tube to fit as an embedded chamber which helps hold it in place and also helps close the rails of the tube in forming the reed. Use of a tube insert requires a reed shape that is wide enough for the rails to seal once the forming process is completed.
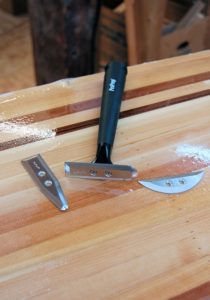
ProPrep scraper
Forming
The reed’s tube is formed with several extra steps. Before forming, be sure to soak the reed in very warm water (120-135 degrees) for greater pliability.
- Start forming the reed tube as usual, warping the reed to the mandrel taper. Attach the first wire and a (temporary) butt wire. No second wire is attached in the first stage of forming to allow room for the insertion of the metal tube.
- The temporary butt wire is removed to allow the tube area to be opened up wider to accept the metal insert. Separate the two halves by lifting up and expanding the tube at the butt end with the forming mandrel.
- The section of metal tube is then inserted into the butt end and forced up into position (into the scooped out area) using a small, thin metal ruler between the blade halves. (See photo below). To be sure the insert is far enough into the tube, measure the position from the butt end to the end of the metal insert. Allow at least 3mm beyond what would be the normal depth of the bocal fully inserted.*
- Return the reed to the mandrel, and with the reed at the proper finished position on the forming mandrel, replace the butt wire.
- Squeeze around the circumference of the tube with small smooth-jawed pliers to help facilitate the closure of the rails along the tube. Note: you may need to cut additional scores into the tube or separate the scores to be sure that they spread sufficiently to close the rails.
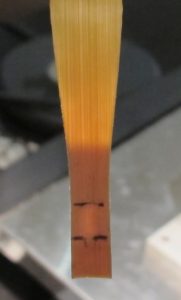
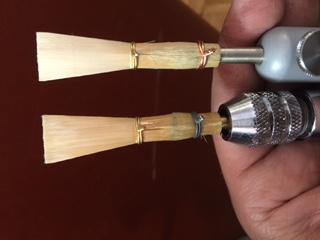
- The reed’s tube is then wrapped with a rubber band onto the forming mandrel and allowed to dry. If properly done, the rails should seal without separation. Note: the second wire can be attached before the rubber banding or after the tube has dried (see photo below, noting the bulge within the tube).
*If reaming to fit the bocal causes the bocal to butt up against the insert leaving the reed loose on the bocal, add a fourth wire over the binding tightening it sufficiently to allow the reed to fit securely onto the bocal.
Fixed Chamber Contrabassoon Reeds
This technique was also recently done on contrabassoon reeds in two different throat sizes with great success. Aluminum tubes were used in this case, and may be the preferred tubing to use vs. brass. Tube size can be 7/32″ to 1/4″ in diameter x 0.014 wall thickness and 8-9mm in length.
The Bulged Chamber Reed
Some bassoonists are experimenting with a bulge in the reed shape between the second wire and the butt end of the reed. This has a similar effect to creating a chamber using a special reamer or using a fixed tube chamber as described above.
The photos below show reeds made by Steve Harriswangler using a special mandrel to accentuate the bulge that allows the reed to dry with an expanded chamber. We assume that the reed must be forced off the mandrel or the butt wire replaced before the binding is applied to maintain and hold the bulge in place.
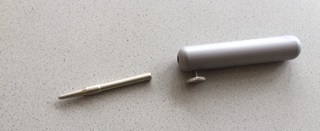
Bulge chamber mandrel made by Rieger
Bulged mandrel prototype by Steve HarrisWangler
New Methods for Cane Evaluation
We are constantly searching for new methods for evaluating cane so we are not wasting precious time and money (see below). We invite you to participate in our research by telling us what you have found!
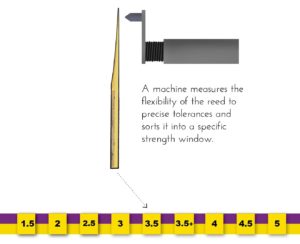
In the 1980’s, a cane hardness meter became available which could be used for evaluating single and double reed cane. My company, Arundo Research, became the first to sell cane rated for hardness, something that single reed players had available in purchasing reeds for decades. Most bassoonists (and all other reed players) have found that soft cane is virtually useless unless you are in the fifth grade as a beginning clarinetist. The question remains, do single reed manufacturers use a cane hardness meter to evaluate cane or do they use a flex meter with the cane that shows how much the blade bends downward under a fixed pressure? Is cane that flexes the most given a softer designation in a 5-point scale with 5 being the hardest?
At the IDRS Conference in June of 2016, I proposed this question: How much would you pay for a piece of bassoon cane that you knew would make a good reed? I also stated that we are being ripped off by cane suppliers who don’t grade cane for hardness or mention a particular cane source range of hardness. Why should we spend the time forming reeds from cane that is destined to fail? What this means to you is a reed in many cases that is dead on arrival.
Another important measure is a piece of cane resistance to twist. A machine was developed by Reeds ‘n Stuff called the Flexter. With this tool a gouged piece of cane can be evaluated to its resistance to twist prior to shaping and profiling. The question remains, is this test the same or different than a flex meter used for single reed evaluation? It is easy to evaluate a dry piece of shaped and profiled cane’s resistance to twist. A piece that can be twisted 180 degrees will not produce a viable reed. What is the definition of resilience and recovery from flexing as the reed vibrates?
Is there a way to measure a potential reed’s tone color? Another test machine is a density meter. Can we assume that cane that is more dense is darker in tone color? Can we assume that cane that is less translucent when looking at the blade profile against a strong light is darker in tone color? Some cane produces an overly vibrant harsh tone while another piece is dull and non-vibrant. The quality of reed cane in its tone and harness is clearly related to its growing location. Reed cane is similar to wine grapes in that the soil and climate produce different qualities and range of hardness and also differences in tone colors. For instance, the general range of hardness from one source can average medium-hard with a bright resonant tone while another source can be medium-hard with a dull, dark tone. Cane that is harvested from a particular micro-climate will display the same general hardness range and tone color from year to year. But cane, like grapes, can have good years and bad years as well as crop failure years. Cane that is collected from multiple growers from different regions (and micro-climates) will be frustratingly inconsistent in tone quality and hardness. When cane is harvested the amount of moisture retained, drying and sun curing are other factors that effect the outcome.
One factor that is often overlooked by bassoonists is the diameter of the cane used in the reed. For oboists, the diameter of the cane is as critical as the thickness of the gouge. The diameter of the cane establishes the size of the tip opening. Oboists do not use a first wire to regulate the tip opening size however they can control the tip opening by squeezing the reed staple similar to bassoonists adjustment of the second wire.
Another overlooked factor for bassoonists is the thickness of the wall of the tube of cane used. The largest cane market is for single reeds and bassoonists receive less desirable cane that is thinner in wall thickness. In addition, bassoonists receive cane diameters that are smaller or larger than what is preferred for the clarinet reed which demands the same diameter as bassoon. Like the oboe reed, cane diameter is another variable to be considered. Size does matter!
Another overlooked factor in bassoon reeds is the symmetry of the outside diameter of the piece of cane. When a section of cane is split from the tube, the cane can have more than one radius if the tube is not perfectly round, which is more common than not. This lack of symmetry has several negative effects that show up in the finished reed if care is not taken. It is surprising how much cane is sold to bassoonists that is not symmetrical in its radius and/or where the thickest point is centered on the piece of cane.
Evaluating hardness is only one measure of a reed’s success. As a single reed player a new box of reeds that is rated for hardness may find only a few reeds that are actually usable. What are the other factors that we should be measuring? Is it possible using other techniques to eliminate all D.O.A. cane so that we don’t waste our time and money?
Please participate in our research and tell us what you have found!
The Cane Testing Methods and Procedures
You must have a cane hardness meter to participate in this new test method.
The dry to wet hardness ratio comparison tests:
- Soak several pieces of gouged cane in room temperature water checking to see which pieces sink first. Mark the pieces that sink first. Let the cane dry out before going on to the next step.
- Measure the dry cane’s hardness on both ends in the center of the gouge. Make note of this number on the cane itself.
- Soak same pieces of cane in hot tap water for 5-10 minutes, then measure for hardness. Add this hardness number on the cane itself. The hardness number for the cane that is soaked will be softer by some degree compared to the dry number.
- After the cane has been shaped and profiled, recheck both dry and wet numbers to confirm that there is no change. Write these numbers in pencil on the blade. These numbers may vary slightly from one end of the cane to the other.
- Form and break in the reeds as usual.
- Using the measurements from step 4, calculate the ratio between the hardness number dry vs. wet (divide the dry number by the wet number) and make note of it. Also check whether the cane that sank first is among the best reeds.
- Play test the reed, assessing the tone quality and playing comfort of the reed.
Examples*:
Reed #1 12 dry / 19 wet Ratio – 1:1.58
Tonal assessment ______
Playing responses assessment _____
Sink test ranking _____
Reed #2 10 dry / 40 wet Ratio – 1:4
Tonal assessment ______
Playing responses assessment _____
Sink test ranking ______
Note: both pieces of cane were among the first to sink in step No. 1, above.
*The numbers above represent an older analog tester. Newer digital hardness meters often show hardness numbers that are twice what are reflected by analog meters.
Some other traditional tests for cane selection are the following. (Note: this text and its tests are still a work in progress.)
- The sink test: Which piece of gouged cane sinks first in a vessel of water?
Answer: The harder pieces of cane that sink first are the best. - The density test: How high does your dry cane float vertically in a tube? Is dense cane better?
Answer: Good question! This may be part of personal preference or related to the Dry to Wet Hardness Ratio test above. The deeper the cane drops into the tube, the more dense the cane. - The thumbnail test 1: How much can you indent the bark of the cane with your thumbnail?
Answer: The bark should not indent easily or have a corduroy texture. Note: there is currently no method when using a cane hardness meter to measure the bark hardness. If one could modify the surface where the cane rests, that would make this measurement possible. - The thumbnail test 2: How much can you indent the interior (gouged) surface with your thumbnail?
Answer: This is the poor man’s hardness meter! Some indentation is expected, but not deep. - The cane color test #1: Are there colors of the bark or gouged surface that should be avoided?
Answer: The worst color to see on the bark of the cane is white over the whole surface. The presence or absence of brown blotches does not effect quality. Green overall color is not a good sign. Waxy and golden is the best. - The cane color test #2: Is the gouged surface of the cane brown?
Answer: If yes, the cane has been exposed to too much ultraviolet light. The cane will be brittle and crack easily. - The Purple Galaxy test: Is cane that has a colored patch of red to purple on the bark better than other cane?
Answer: Usually yes. This is the side of the tube of cane that has been facing the sun during growth. - The twist test: How much twist resistance is desirable?
Answer: More resistance is better. This can be done with a piece of dry shaped and profiled cane if you are careful. - The flex and recovery test: How much resilience/strength does the cane have? How much can the cane bend lengthwise?
Answer: There is no measurement device as used by single reed manufacturers (see below). - The bubble test: How many bubbles can you produce blowing through the butt end of wetted cane?
Answer: The fewer the bubbles, the better. This indicates a finer grain (smaller vascular bundles). - The diameter test: What is the ideal diameter of a tube of cane?
Answer: The typical diameter is 1 inch (25.4mm), but climate rules! Larger diameter for wet climates, smaller diameter for dry climates and high altitude. - The rock and roll test: Does the bark side of gouged and/or shaped and profiled cane rotate equally when pressed down right and left on a hard surface or does it rock more to one side than the other?
Answer: The cane should rock equally side to side indicating a symmetrical radius on the exterior of the cane. - Gouge symmetry test: Is the gouge thickest in the center of the piece of cane?
Answer: It should be, but it is often slightly off center. Use a dial indicator to find and mark the thickest point in the gouged piece of cane. This will be a critically important measurement when you shape and profile the cane. Trim off the thinner edge (lengthwise) so that the thickest point is in the center. - The gouge radius symmetry test: Is it symmetrical from the center to the outside edges? Using a dial indicator measure the thickness of the center to the edge of the gouged cane at five points: left edge, midpoint, center, midpoint, and right edge.
Answer: It should be symmetrical. If it is not, the cane radius or center thickness may be off. It may be impossible to correct, but “close” is okay. If it is way off, the profiled cane will show the bark on one side at the back of the blade profile and the bark may run down along the edge of the reed shape. <Photo example> - Shape and profile symmetry tests: Are both the reed shape and blade profile centered on the thickest point of the gouged cane?
Answer: If the cane is shaped first (using a straight shaper), the shaper should always be centered over the thickest part of the gouge. When profiling, the center line of the profile should be centered on the exact thickest point of the gouge. - The thickness test: What is the ideal thickness of gouged cane?
Answer: Thinner is best for high humidity; thicker is best for low humidity. Generally, thinner cane measures harder. - The transparency test: How translucent is the blade on a piece of profiled cane when held up to a strong light?
Answer: If the color looks white or very translucent, the cane is probably weak. If it is very dark, it can be very dense or harder cane. If one side of the profiled cane is significantly darker or lighter, then the cane will be unequal in hardness or density. - The taste test: Is the taste sweet or bitter?
Answer: The can should taste sweet as an indication of maturity and sun curing.
Some new tests to consider:
- The soaked vs. dry cane hardness comparison test: What is the best ratio?
- The thoroughly soaked (over days) hardness comparison test.
- The soaked in a solution of (?) evaluation.
- The silica test: How much silica content is desirable? Does too much make the tone harsh?
- The vascular bundle count and diameters.
- The inter-cellular spaces.
- Lignification (woodiness) measurement: Is this related to the thickness of the cell walls or some other factor?
- Comparison of measured gouged cane to cane of the same measurements that has been soaked in distilled water (with regular/daily water changes). Does water soaking equalize differences in cane?
Footnotes:
-
- THE EFFECTS OF HARDNESS AND STIFFNESS OF BASSOON CANE UPON PERFORMANCE OF THE REED
By Lawrence J. Intravaia (d. 1973)
- THE EFFECTS OF HARDNESS AND STIFFNESS OF BASSOON CANE UPON PERFORMANCE OF THE REED