
Clean Your Tone Holes
This is a MUST DO on a regular basis. If you want to play in tune, clean your tone holes! They need to be the right size.
Using wet Q-Tips, thoroughly scrub the inside of the F, E, D, C and B open tone holes until no gunk or discolorations appear on the Q-Tips.
- The F tone hole is small making it difficult to get the Q-Tip through. Pull out on the end of the cotton tip to make it smaller.
- Push each Q-Tip all the way through the tone hole into the bore and back out. Repeat with the other (wetted) end of the Q-Tip.
- Use at least one Q-Tip for each tone hole.
- When finished, it is important to swab (from the big to small end of the wing and boot) to clear the bore of the debris. If possible, finish with a blast of compressed air as well.
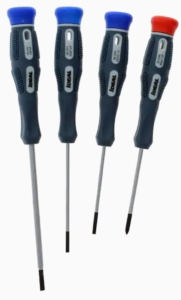
Closed tone holes require that the keys be removed from the instrument using a screwdriver of the proper size. When purchasing screwdrivers, look for larger handles, and ones with a rotating top. These make it easier to use than tiny screwdrivers available at woodwind specialty shops. Recommended tip sizes are 1/8″ and 3/32″. If the bassoon has a plateau left-hand D key, you will need a 3/32″ screwdriver to remove the key to clean the tone hole. For more information, see Tools Needed for Key Removal below.
Many closed vent keys and small tone holes need regular cleaning. Once keys are removed, clean the pads prior to reassembly. If any debris is present, use a soft toothbrush to remove debris from the pad. Inspect pads for dents or depressions. (See Refresh Pads, below.) If possible, clean and lubricate rods before screwing them back in.
- Register key vents (flick keys): high D, B/C and A/B-flat vent holes. These keys must be carefully removed using a 3/32″ screwdriver. Clean the vent holes with a soft pipe cleaner. Push the pipe cleaner clear through to the bore. When reassembling, take care that the flat spring sits properly in the spring holder/cradle.
- C# key on the wing joint. When the wing joint is swabbed, moisture and debris is often trapped inside the C# tone hole. This key is easy to unscrew with a 3/32″ screwdriver. Use Q-Tips and scrub thoroughly, pushing the Q-Tip into the bore. It’s critical to maintain this on a regular basis. C# is always a problem note, even without it being clogged up with debris!
- High E key and E-flat/F# trill keys. Warning: don’t attempt this unless you are mechanically inclined! This requires careful removal and replacement of the long rod and springs that operate the high E and E-flat keys. These keys are tricky to reposition. The tone holes are often so clogged that getting these high notes to speak is hindered. These pads are often the first to leak as they deteriorate from long term contact with moisture trapped in the tone hole. Once the keys are removed be sure the pads are cleaned and reconditioned (see Refresh Pads below). You will need to carefully remove and replace the rod with pliers.
- Right-hand C# trill key on the boot. This one is easy to remove and is almost always clogged and stays wet inside for years on end. Although this key is rarely used, it can cause problems with a big sneaky leak and wetness can lead to dry rot. Keeping this tone hole squeaky clean has beneficial effects for the bassoon’s acoustics, effecting neighboring notes.
Clean Your Bocal
First, make sure the inside of the bocal is wet. Immerse the bocal under water and let it sit. We recommend you use a bocal brush, which is inexpensive and widely available from double reed shops. Run the bocal brush though several times from the large end out through the small end. Flush out with water each time.
If you don’t have a bocal brush you can use pipe cleaners. There are two types of pipe cleaners: all cotton and hard bristle. Use the all cotton type, such as the Dill’s brand. Avoid hard bristle or metal styles.
- Fold over the end of one of the pipe cleaners about 1 inch.
- On the opposite end, twist several pipe cleaners together. Be sure they are firmly attached to each other. Overlap them at least 1 inch, then twist together several times.
- Insert the folded over end into the tip of the bocal and carefully scrub back and forth as you insert the pipe cleaner further into the bocal.
- Flush the bocal with water.
- Repeat by inserting from the large end. Carefully push out through the tip and pull the pipe cleaners through.
- Take great care that the pipe cleaners are twisted together and strong enough that they won’t come apart inside the bocal.
Cleaning the Bocal Vent
Bassoonists rarely, if ever, clean the important vent hole in the bocal. Difficulty in croaking notes in the second octave can be traced to this tiny vent hole. In some cases the bocal has a manufacturing flaw, narrowing the vent diameter.
Insert a paper clip or reed wire into the hole in the bocal vent. Run it completely through a couple of times. If the paper clip catches before entering the bocal’s bore there may be an obstruction of solder or plating (plating slump) at the bottom of the vent. If the bocal vent is clogged it may require the use of a miniature drill bit to open the vent to normal specifications.
Does the Bocal Fit too Loosely in the Bassoon?
Solution 1: wrap dental floss around the cork on the bocal. Waxed dental floss is best; it will stick to itself and stay attached to the cork.
Solution 2: wrap thread around the cork on the bocal. Rub candle wax onto the thread to help it stick together and lubricate the thread.
Solution 3: insert the cork end of the bocal into a glass of water. Remove from water and wave the cork over a lit candle or a hot burner on the stove. The heat will cause the cork to swell up. Repeat several times. Caution: cork is extremely flammable therefore only hold it in the flame for a short amount of time and rotate the cork in the flame and quickly back into the water. Don’t try this method on the bassoon’s wing or bass joints. Instead use the dental floss or thread wrap if the joints are loose.
Is the Tip of your Bocal Round or Flat on One Side?
If the bocal tip is not round, insert an undersized nail or the tip of a small screw driver into the tip. Carefully push the side of the screw driver or nail against the flattened side of the bocal tip. You can also use a reed forming mandrel or the dull end of a drill bit that is close to the right size. These operations should be done very slowly and carefully so that you don’t break open the soldered seam on the bocal. A normal tip opening is 4mm or 5/32″. You might check the tip with a drill bit of this size.
Clean the Dust off Your Bassoon
Many problems with pad leaks are attributed to reed scraping debris, animal hair (don’t let them sleep in your case!), and dust. Use a soft, medium-size cosmetic brush to keep the body of the instrument clean to prevent migration of debris onto pads. If that doesn’t remove the dust or gunk use dry or wetted Q-Tips to scrub around the area that is thick with gunk.
Vacuum your Bassoon Case
Have you ever found your cat sleeping in your open bassoon case? Or laid the case down on the carpet to find it covered with dog hair? Pet hair can and will end up in your case and on your bassoon. A German Shepard hair laying across a pad can cause a big enough leak to ruin your day. Vacuuming a case is the LAST thing bassoonists think about, but as one who repairs other’s bassoons I find most cases are filthy with all kinds of floating objects. If you lay the bassoon in your lap while scraping reeds, the bassoon collects all the debris and can deposit it inside the case when you put the bassoon away. Vacuum the case! Clean the dust off the bassoon.
Check your Bassoon for Leaks
Wing Joint Test
Plug the small end of the wing joint with your finger or small rubber cork and with the other hand cover the tone holes. Your hand will be backwards on the tone holes. Blow forcefully into the large end (tenon). If there are leaks present, you will be able to hear and feel the leaks. (This is the preferred test.) You may want to clean off the cork grease or gunk on the large end before doing this.
Don’t use a suction test as it will not identify weak springs.
Boot Joint Test
To identify leaks in the boot joint, place the left hand over the large bore opening. Close all keys with the right hand and blow into the opening of the small bore. If leaks are present you will either hear the sound of air escaping or you’ll feel little resistance.
Clean Sticky Pads
It is common for some keys to stick or be stuck shut. For instance, the A-flat and G key pads. To quickly fix a sticking pad, use old paper currency to clean the pads. Place the bill between the open pad and tone hole, press down firmly to close the pad, and slowly pull out the bill while maintaining pressure on the pad. Older currency has oils in the paper from handling the bills over time. If possible, try pulling the currency in different directions several times. Woodwind pad cleaning paper can also purchased from Amazon.
If you have pads that remain sticky, sprinkle talcum powder on the currency or on a piece of paper and again pull the paper out from under the closed pad. If the pads are extremely dirty or sticky scrub with a wetted Q-Tip. Follow up with the talcum powder/paper currency treatment as needed. Also consider removing the key and pad and cleaning the surface of the tone hole area.
Tools Needed for Key Removal
You may need to remove the pad from the instrument for thorough cleaning especially if you have determined that there is a leak (see above). It is recommended that you acquire screwdrivers of the appropriate size with rotating handles. The precision screwdriver set should contain an 1/8″ tip for larger, pivot screws (in the post) and 3/32″ tip for removing the small rods that hold keys to the post. Small needle-nose pliers are needed to remove and replace small rods. The small screw driver tips can also be used to push the springs back in place. Crochet hooks could also be used to pull or push springs. Be sure the key, rod and spring are properly aligned with the post before screwing tightening the pivot screw.
Refresh your Pads
Once you have removed a pad you may find debris or a dent in the pad that may be causing the pad to leak (see above). It is very common that debris from the case or reed scrapings end up on pads. If so, massage the skin of the pad with a wetted Q-Tip to clean and refresh the pad surface. If a significant dent remains in the pad surface, the dent can be removed using the following process:
- Wet the surface of the pad thoroughly by dunking the key and pad in water.
- Wave the wetted pad well above a flame from a candle but close enough to effect the pad. You can also use a burner on your stovetop. The pad should swell or puff up when heated sufficiently.
- Do this carefully, rewetting and re-passing over the flame/heat until the pad visibly swells. This process should push out the dent. It needs to be done very carefully, or you’ll burn the pad! Be sure to rewet the pad before you pass it over the flame.
- While the key is off the bassoon, inspect and clean the edge of the tone hole so that the surface is smooth and even.
- Once swollen, replace the key onto the bassoon. To reseat the pad on the crown of the tone hole, press down firmly on the pad or use repeated tapping on the key to reestablish the seal.
Check the Whisper Key
The condition and closure of the whisper key pad is often an overlooked problem. When the lowest notes don’t speak easily, the first thing to check is the whisper key pad. The following things should be checked:
- Is the whisper key pad completely closed when the right thumb low E key is closed?
- Is the whisper key pad’s skin cracked, deeply indented, or missing?
- When the whisper key is completely closed, does the Low E close easily all the way to the bottom without any resistance? Or does it require extra pressure with the right thumb?
These problems are often a very simple adjustment. Or it’s not. The first thing to check is the bridge key alignment on the boot. The bridge key is the connector from the wing joint to the rod that leads to the Low E pancake key. Most modern bassoons have a mark on the metal band on the boot joint, and a line on the wing joint. Always check the alignment with the markers. If you don’t have a marker, the proper alignment is when the curve of the wing joint is symmetrical to the receiver/well of the long joint. If problem persists, check if the bridge key is bent or if the plastic wrap (shrink tubing) is missing on the bridge key lever. If the key is bent, it is advisable to take it to a repairman for a quick fix. This is something that can be done in under five minutes. He/she can also replace missing shrink tubing as well. If it is only the shrink tubing that is missing, it is available at most local hardware stores. An alternate solution to shrink tubing is to wrap the lever with waxed dental floss or linen thread and build it up until the whisper key closes using the pancake key. When using linen thread, be sure to seal it with wax or finger nail polish after it’s applied.
If the wing joint is loose and rotates out of position, it is not a tight enough fit to the boot joint, causing leaks. The wing joint should fit snuggly in the boot, and never be so loose as to fall apart when held by the wing joint. A tight fit must be maintained. If your wing joint tenon is wrapped with red thread, as is the case with most Fox and Renard bassoons, never use cork grease on the thread. Only use candle wax to lubricate the assembly. Use of cork grease will disintegrate the thread over time, loosening the joint and possibly causing damage to the bassoon if the wing and boot accidentally separate from each other. Reminder: for safety, always pick up the bassoon with two hands.
If the whisper key does not close when the Low E key if fully depressed and there is proper alignment and snug fit (as mentioned above), check the following: with the Low E closed, does closing the whisper key with the left thumb now close the pad at the bocal? If so, inspect the whisper key pad. If it is deeply indented, the pad can be refreshed (see above). If the pad is cracked, exposing the felt under the pad’s skin, this is also a quick five-minute repair from the local repairman. An alternate emergency fix for a cracked pad is to wrap the pad with plumber’s Teflon (thread sealant) tape. Stretch the tape, and wrap it around the pad and pad cup/rod. Ultimately, the pad should be replaced.
If the whisper key pad has fallen out but is in good shape and was closing correctly, a quick fix is to wrap the sealant tape as outlined above. But if you are in the concert hall, what then? The solution is to find a cigarette lighter. Hold the wing joint at a 45 degree angle and put the lighter’s flame directly under the metal pad cup to heat up the metal for around 30 seconds or until the metal is sufficiently hot enough to melt the adhesive within the pad’s cup. Press the pad firmly into the pad cup to fix it into position.
In some cases, the pad cup or the whisper key is bent and out of position due to an accidental dropping of the instrument or improper placement of the wing joint into the bassoon case. In this instance it may be possible to bend the key with a small pair of pliers to restore alignment. However, it’s safer to have a five-minute repair from a repairman.
If the whisper key pad does not close completely with the Low E key or the whisper key, the spring and/or felt might be missing from the end of the rod that is activated by the whisper key itself. The lever at the end of the rod can be wrapped with string or covered with shrink tubing which requires heating with a flame. Or a piece of thick felt may be super glued to the end of the lever. If the thickness of the material is sufficient, the whisper key pad should close.
What if the whisper key pad does not open, but stays shut? In most cases, the spring at the top of the rod near the pad has become disengaged from it’s hook. Check to make sure the whisper key lock is not accidently engaged. If the spring is out of position at the hook, it can be pushed back into place using a small-tipped screw driver (see above). The easier way is to take the key off at the top by removing the screw, swing it out far enough to access the spring, reposition the spring on the hook, then slide the rod back into position and replace the screw.
If the whisper key closes and the pancake does not close completely and easily with a light touch, the typical cause is that the wing joint has been rotated out of position in the boot. It is likely rotated too far counterclockwise. Rotate it back into position at the marker. If all other measures have been taken care of to get the whisper key to close and the pancake still does not close easily and completely, rotate the wing joint clockwise until both the whisper key and the pancake key close easily and completely.
Make Reeds
If you are not a reed maker, maybe now is the time to learn! We are sure that the double reed and cane shops would appreciate your business.
Adjust your Reeds and Check Their Tuning
Purchase the Quick Guide for Bassoon Reed Tuning available on Amazon.
Make Sanding Tools
Schedule a Re-pad Overhaul or Restoration Service for your Bassoon
If you play a Fox instrument you can make an appointment with the factory to have your bassoon serviced.
Practice Warm-up Exercises
When is the last time you practiced ALL of your scales including the chromatic scale? If you really want to stretch out, practice your two whole tone scales and three diminished scales (see below).
Click here for warm-up exercises and more
Practice the Dreaded Double Tongue
At some point all bassoonists will need to double tongue in the standard symphonic literature. For instance, the bassoon solo in Beethoven’s Symphony No. 4, last movement, the repeated notes in Mozart’s Marriage of Figaro overture, Berlioz’s Symphonie Fantastique, as well as many Haydn and Mozart symphonies.
We often take a cue from brass players’ techniques using the following syllables: t-k-t-k (ta-ka-ta-ka) or ki-ti-ki-ti (calling your cat!). This vowel placement is too high at the back of the tongue and also produces a very accented double tongue sound. It sounds like tha-ka-tha-ka. There is a better way for bassoonists: d-g-d-g (da-ga-da-ga). This produces a smoother articulation and can be performed at softer dynamics. It is essential to practice double tonging at a very slow speed seeking to match the same attack quality so that each articulation sounds identical whether double tonguing or single tonguing.
Begin your slow practice by stopping the tone at the back of the tongue and then stopping the tone at the tip of the tongue using short bursts of sound. It does not need to be the tip of the tongue into the tip of the reed. Example: dug-gud-dug-gud, where the tongue stops at the back of the throat then front. The tongue is sealing the back of the throat and no air can escape. It is recommended to practice starting the tone with repeated “ga-ga-ga-ga” articulations on the same note. See exercise below.
This exercise can take place away from the instrument to develop speed: da-ga-da-ga. However, when the embouchure is formed, it tends to restrict the space inside the mouth for the movement of the tongue. The “ah” vowel sound may need to move more in the direction of “oo” as in doo-goo-doo-goo.
Some players who have not been able to perfect double tonguing use two tongued and two slurred technique. However, this technique is not possible on repeated notes. An alternative technique can be used by wobbling/slapping the tip of the tongue up and down (dee-dle-dee-dle), above and below the tip opening of the reed or side to side. The wobble tongue is good for a couple of “flicks”. For instance, you can use it in Rossini’s William Tell overture (the Lone Ranger theme) for the first two notes only. In most cases, however, it cannot achieve what is possible using the double tongue technique and is harder to control. The method chosen must produce the most musically pleasing and accurate result. Triple tonguing as used by brass players is never used by bassoonists.
Create Your Artistic Vibrato
Here’s an exercise to help develop an even vibrato: Download Vibrato Practice Method. (Check your Downloads folder if the file doesn’t open.)
Practice Your Scales
Always warm up BEFORE doing the Scales Bottom to Top exercise (see topic on warming up, above). Bassoonists who don’t warm up before playing in the middle and upper registers of the bassoon will develop a bad habit of biting the reed to get the upper notes to respond or play up to pitch. This can cause a thin, pinched off tone that sounds sharp in pitch. Or the highest notes may not speak at all. This can lead to a bad embouchure habit that is hard to break and bassoon reeds that are not properly tuned. You should be able the entire standard range of the bassoon out of the corner of your mouth. (This is the final test in Quick Guide to Bassoon Reed Tuning.)
Note: In the Scales Bottom to Top exercise below, the lowest note of the scale is not necessarily the tonic or root of the scale. The first note can be any note in that scale’s key signature.
You do not need to practice the scales below in their entirety until you are comfortable playing each section of the scale. For example, you can cut out the middle measure(s) of any scale. You can also jump across from the ascending scale to any beat in the scale connecting to the corresponding descending portion of the scale. You can start on any beat and go “round and round” by connecting to the corresponding note of the descending scale (which may be one note higher or lower than the ascending scale). The Scales Bottom to Top exercise can also help you learn tenor clef.
Download Scales Bottom to Top exercise (Check your Downloads folder if the file doesn’t open.)
Six-Note Scales and Eight-Note Scales
The whole tone scale contains six whole steps. The two scales cover the twelve tones in the chromatic scale. Unlike the diatonic, seven-note scale there are no half steps.
The three eight-note diminished scales combine consecutive half and whole steps or whole and half steps. They are more unusual, and commonly found in jazz compositions and improvisation off of the V7 chord. Diminished chords are found commonly in all forms of music. Every other note of the diminished scales forms a diminished seventh chord.
Download Whole Tone Scales, Diminished Scales and Diminished 7th Chords exercises (Check your Downloads folder if the file doesn’t open.)
The following Debussy piece contains a very tricky passage in both the first and second bassoon parts using the two (six-note) whole tone scales in tenor clef. The second scale, starting on E-flat, goes back and forth rapidly between the upper Db and E-flat twice. It is recommended to use the Db-E-flat trill fingering: While fingering short Db (no extra keys in right hand) simply lift the 3rd finger left hand for the E-flat. The tempo for this passage is a snappy allegro between 144 and 160 beats per minute (bpm).
Download Debussy Fêtes from Nocturnes (example of whole tone scales) (Check your Downloads folder if the file doesn’t open.)
Practice Your Trills and Turns
Perhaps the most overlooked area in bassoon pedagogy are the half and whole step trills and turns. These ornaments are commonly seen in Baroque music. Most bassoonists do not practice trills on a regular basis. Begin your practice above the lowest notes as the lowest register notes are extremely difficult and not commonly used in trills. Some treatises on the bassoon have said to avoid trills. The use of one-finger trills are preferred where possible. Two or three finger trills sound funky, out of tune and clunky in execution. Some bassoons have extra trill keys that make difficult trills possible. Some of the low notes cannot be trilled without special added keys or tricks. In my teaching I would assign two or three lines in the exercise below per lesson to achieve some comfort in execution.
Download Trills and Turns exercise (Check your Downloads folder if the file doesn’t open.)
Practice Nasty Passages
- Mozart, Requiem, 2nd bassoon, Movement 8: Domine Jesu
- Mozart, Symphony No. 35 (Haffner), Finale (both bassoons)
- Mozart, Overture to the Marriage of Figaro (both bassoons)
- Mozart, Cosi Fan Tutte, Overture, 1st bassoon
- Beethoven, Symphony No. 4, 4th movement (both bassoons)
- Stravinsky, Pulcinella, 1st bassoon
- Rossini, Barber of Seville, 1st bassoon, Overture and “The Figaro’s Aria” (Largo al Factotem)
- Smetana, The Bartered Bride, 1st bassoon
- Tchaikovsky, Symphony No. 4, last movement